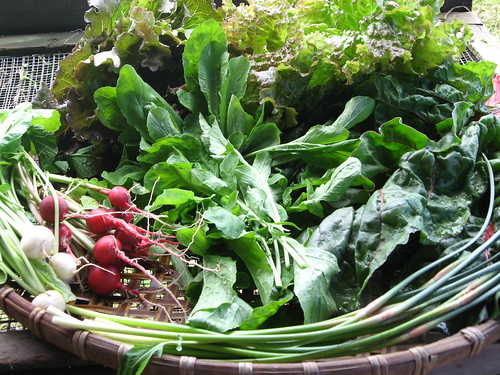
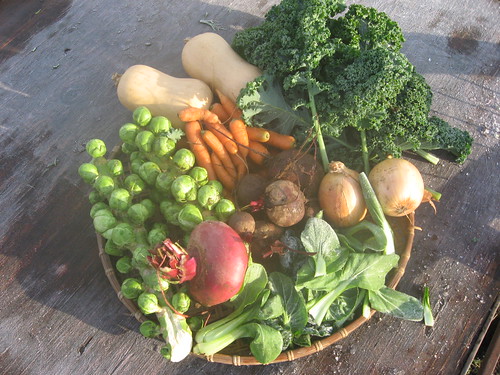
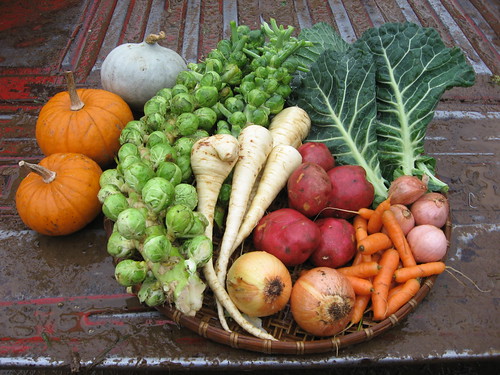
Image

Author Archive for csa – Page 24

CSA Newsletter: Week 6- June 23, 2008

Posted by csa on
 June 23, 2008

This Week’s Share


  • Broccoli
  • Carrots
  • Fennel
  • Garlic Scapes
  • Lettuce
  • Mizuna
  • Spinach
  • Summer Savory


Summer Savory is in!
…..A new crop for the farm this year, we are still discovering ways to utilize this delicious herb. Savory leaves can be used fresh or dried in soups, eggs, vegetables, beans and lentils, poultry, pork, sausage, veal, turkey, tomato and cheese dishes. For tips on storage and other information on summer savory, click on this link.

Recipes


Very Simple Summer Savory Vinaigrette
Adapted from Simple Measures


1 part balsamic vinegar combined with 3 parts extra virgin olive oil
1 tsp. Fresh Summer savory, minced


Whisk ingredients together and serve over salad.


Crepes with Savory
Adapted from Gardenweb.com

1 cup wholemeal plain flour
1 teaspoon ground savory
2 eggs
2 tablespoons oil
buttermilk, milk or water


Combine all ingredients, using enough liquid to make a thin creamy batter. Heat a frypan pan and grease lightly. Pour in enough batter to lightly coat the base of the pan. Cook until bubbles break on surface, turn over and cook for a few seconds on reverse side. Stack and keep warm. Serve with your choice of crepe fillings. A sauté of spinach and onions with a little cheese maybe?


Summer Savory and Mustard Marinade
Adapted from Gourmet Magazine

2 Tbl Dijon mustard
1 Tbl red wine vinegar
¼ cup olive oil
3 Tbl finely chopped summer savory
1 Tbl water
Salt and pepper to taste


Whisk together ingredients. Use as a marinade for your choice of grilled meat or vegetables. Marinade for 15 minutes.


Carrot Cumin Salad
adapted from Vegetable Love by Barbara Kafka


1 clove garlic, smashed and peeled
1 pound carrots trimmed and cut on the diagonal into 1/8-inch slices (about 1 and 1/2 cups)
1/8 teaspoon ground cinnamon
1/4 teaspoon ground cumin
1/2 teaspoon sweet paprika
Pinch of cayenne pepper
Juice of 1 lemon
1/8 teaspoon sugar
Kosher salt to taste
Olive oil to taste.


Fill a medium saucepan with water, add the garlic and bring to a boil. Add the carrots and cook until just barely tender. Drain, discard the garlic. Transfer the carrots to a bowl.
Mix together the spices, lemon juice and sugar. Salt to taste. Pour over the carrots. Chill.
Sprinkle with olive oil before serving. Makes 1 and 1/2 cups.


Braised Fennel
adapted from Vegetable Love by Barbara Kafka

1 and 1/2 tablespoons olive oil
3 fennel bulbs trimmed and cut through into 3 to 6 wedges. (Wedges should be about two inches wide at most)
1 teaspoon kosher salt
1 teaspoon fresh lemon juice
1 cup Basic chicken stock/Roasted Chicken Stock/Commercial chicken broth
Fresh ground black pepper to taste


In a medium pan, heat the olive oil over low heat. Add the fennel pieces and salt. Cook gently for about 10 minutes, turning occasionally, until the fennel is softened.
Add the lemon juice. Cook for 10 minutes. Pour in enough chicken stock to cover the fennel. Simmer gently, partially covered about 1 hour, until the fennel is very tender. The liquid should be reduced to a glaze. Taste; add pepper and more salt if desired. To serve, toss the fennel with the glaze to coat


Spinach Salad with Sesame Peanut Dressing
adapted from The Best of Bloodroot Volume One cookbook, by Selma Miriam and Noel Furie


In a food processor combine:

1/2 cup peanut butter (without added fats or sweeteners)
2 teaspoons agave nectar or honey
1 tablespoon white miso
1 tablespoon dark toasted sesame oil
1 tablespoon tomato paste
2 tablespoons tamari
1 tablespoon mirin (if not available use rice vinegar)


Turn processor on, gradually adding 1 cup of water. Process until mixed well. Correct seasoning. Refrigerate. In a 300 degree oven brown 3 tablespoons of sesame seeds lightly. Set aside. Prepare a bed of well-washed spinach leaves. Ladle Dressing over spinach. Sprinkle with sesame seeds. Hardboiled egg slices are an optional garnish.


Lentils with Spinach (quick tasty dinner solution)
adapted from Kanzeon in the Kitchen by The Dharma Rain Zen Center Sangha

Your share of Spinach chopped
1 large onion
2 Tablespoon olive oil
2-3 cloves garlic peeled and minced
2 cups dried lentils picked over, washed and drained (small Spanish lentils are nice as they cook quickly)
2 teaspoons of salt
2 teaspoons of ground cumin


Chop Onion. Heat oil in a pot (cast iron is best) over a medium flame. When hot, put in onion and garlic. Sauté for a few minutes. Now put in lentils along with two cups of water. Bring to a boil. Cover, lower heat and simmer about 25 minutes or until lentils are just tender. Add Spinach, salt, cumin. Stir gently to mix and bring to a simmer until heated through.
Makes 7 or 8 Servings


Field Notes by Tanya (SIO Farm Manager)


It’s been a while since I’ve stopped to reflect on where we are in season. The last couple of months have been full and busy with the arrival of this year’s apprentice crew in early May, the beginning of CSA harvests, and a full slate of plantings to get in the ground. Last Friday on field walk I could feel a clear shift in the season, right on schedule it seems with the official start of summer and the longest days of the year.


For one thing, the share is starting to gain a little weight and a few crops are making their debut this week. The return of carrots is always exciting. This year we have put much energy into our carrot crop in hope that we can out smart the carrot rust fly that caused damage to much of our 2007 crop. We have begun covering all our carrot beds with floating row cover before the carrot seeds germinate. This barrier keeps adult flies from laying eggs at the base of the carrot plants. The larvae that hatch from these eggs feed on the carrot root and caused the damage we experienced last year. Today’s harvest of Napoli carrots was free of any evidence of rust fly damage and tastes great. Also new this week is fennel, one of my favorite vegetables. I like to parboil it and then sauté in lots of butter until it’s really tender. We’ve included a lighter recipe in the blog for you to try too. Really, if you are only familiar with fennel seeds you must give the bulbs a try. And if you love them, know that there’s more coming in a couple weeks.


There are other crops just around the corner. Pods are developing on the fava plants with little beans tucked inside the fuzzy white pod. The flowers on the potato plants indicate that tuber formation has begun. Last week marked the beginning of garlic harvest, dictated by the number of wrappers on the garlic bulbs. The wrappers preserve the garlic bulb in storage, so having enough wrappers is important. Though much of our garlic is distributed to you within a relatively short time, we do save some for seed each year to replant in the fall. We look for 5-7 wrappers on a given variety to initiate harvest. We’ll be harvesting garlic over the next few weeks. You can expect to see it in your share soon.


By now we have most of our major plantings in the ground. The night time lows are hovering safely enough around 50° that we will plant our peppers and eggplant this week. Some of the crops that you won’t see in the share until October and November – Brussels sprouts and parsnips – to name a few – are already in the ground. Fall kale and collards are being seeded in the greenhouse now. The sweet corn field is planted – one full acre – decked out with mylar tape, an inflatable snake, and a scarecrow standing guard.


Fifteen hours of daylight means plants grow faster. Last week the crew commented on seeing the potato plants grow from one day to the next. Along with the vegetables, the weeds are taking full advantage of these hours of light. Now that the fields are mostly planted out, we’ll be transitioning our focus to keeping the weeds down, both with steel and hand.


The crew has started to get into a good rhythm and it is hard to imagine that we have only been working together for a couple of months. As satisfying as seeing the fruits on the tomatoes start to grow, swell, and sweeten is being witness to the camaraderie that grows in the fields over the work of planting, weeding, and harvesting. I hope its spirit infuses the harvest you share in.

Categories : CSA Newsletter, Farm News & Updates, Recipe

CSA Newsletter: Week 5- June 16, 2008

Posted by csa on
 June 16, 2008


This Week’s Share


  • Arugula
  • Asian Greens, Fuyo Shomi 
  • Broccoli
  • Kale
  • Lettuce
  • Turnips


Recipes


Vegetable Stir Fry with Glass Noodles

Adapted from Vegetarian cooking for Everyone


2 ounces mung bean noodles

6 dried Chinese black or shiitake mushrooms

1 pound vegetables – ½ lb. broccoli and ½ lb. Hakurei turnips will work

3 tablespoons sesame or peanut oil

4 teaspoons each of chopped garlic and ginger – if using green garlic increase amount

1 onion chopped

1 or 2 heads Fuyu Shomi, sliced into strips

Salt

2 tablespoons soy sauce

¾ cup water from soaking mushrooms

2 teaspoons cornstarch diluted in 3 tablespoons stock or water

1 teaspoon dark sesame, chili, or roasted peanut oil


Soak noodles in warm water for 20 minutes or until soft. Soak the mushrooms in 1 cup warm water for 20 minutes. Reserve mushroom-soaking water and slice caps into strips. Thinly slice vegetables. Heat the wok and add 2 tablespoons of oil. When hot add garlic, onion, ginger, and mushrooms. Stir-fry for one minute, add vegetables. Salt lightly and stir-fry for 4-5 minutes until tender firm. Remove and set aside. Heat the third tablespoon of oil in the wok, add noodles, soy sauce, and mushroom water, and simmer for 2 minutes. Return vegetables to wok, add diluted cornstarch, and cook until the vegetables are glazed. Toss with dark sesame oil and serve.

Fuyu Shomi and Buckwheat Noodles in Seasoned Broth

Adapted from Feeding the Whole Family by Cynthia Lair

1 package soba or udon noodles
2 teaspoons toasted sesame oil
1 onion, cut in thin half moons
2-3 cloves garlic or equivalent of green garlic, minced
2-5 Hakurei Turnips cut into matchsticks
5 shiitake mushrooms, cut into bite-sized pieces
2 cups Fuyu Shomi, chopped
4 cups water
1/3 cup tamari, shoyu, or soy sauce
½ pound firm tofu, cut into ½” cubes
1 tablespoon freshly grated gingerroot


Prepare the noodles according to package directions. Drain and set aside.
Heat oil in a 4 quart soup pot. Add onion and garlic; sauté over medium heat until onion begins to soften. Add turnip and mushroom pieces; sauté a few minutes more. Add Fuyu Shomi, water, tamari, tofu, and ginger. Bring heat up until mixture begins to simmer. Cover and let simmer for 10 minutes. Serve this dish by placing a handful of noodles in each serving dish. Ladle broth and vegetables over the noodles. Serves 4.

Curried Turnips

Adapted from Vegetarian Times Complete Cookbook

1 onion, chopped

2 tablespoons oil

3-5 Hakurei turnips, peeled and sliced thinly

2 teaspoons curry powder

1 teaspoon salt lemon wedges


Cook onion in oil for approximately 5 minutes over medium heat, stirring regularly, until it begins to brown. Stir in the turnips and cook 5 minutes more. Add curry powder and salt, and cook until tender, about 3 to 5 minutes. Squeeze a fresh lemon wedge over dish before serving. Serve hot with additional wedges. Serves 4.

Lemon Tahini Dressing

Adapted from Vegan World Fusion

½ cup raw tahini

½ cup water

¾ tablespoon fresh lemon juice

1 tablespoon red wine vinegar

2 cloves garlic, minced

½ teaspoon salt

⅛ teaspoon ground black pepper

1 teaspoon cumin, ground


Whisk together all ingredients until smooth and then let dressing sit for at least 15 minutes before serving. This dressing tastes wonderful on sauted lacinato kale. Makes 1 1/4 cups.

Weather Notes


Yes, this has been a colder then usual spring. On Friday our night time low was 38 degrees. At this time of year we are usually looking at night time lows of about 50 degrees. We are seeing some cold stress on our more sensitive crops such as beans, basil and cucumbers but with the warmer weather in the forecast they should bounce back quickly.  We are keeping the eggplants and peppers happy in the greenhouse until we see night time temperatures hit 50 degrees at which point we will plant them in the fields. We are hoping that summer will truly be here when the solstice hits on Saturday the 21st. As we await the warmth of summer we can truly enjoy the vegetables of a long Oregon spring. In the next few weeks the greens of your share will be brightened by the white of fennel, the orange of carrots and the red of beets.

Love Notes


CSA member Brandon S writes- Love the farm share. A highlight each week for the family. Any consideration of folks submitting the food they make from the share each week — at least a photo— to the blog each week?

For instance I have attached the family meal this Sunday:

“Salad share with roast chicken breast accompanied by mac n’ cheese with sautéed radishes and braised chard. chardonay too.

Any one else want to send in pictures and/or recipes….

Categories : CSA Newsletter, Recipe

CSA Newsletter: Week 4- June 9, 2008

Posted by csa on
 June 9, 2008


This Week’s Share


  • Green Garlic
  • Kale
  • Lettuce
  • Mizuna
  • Onions, Sweet


Broccoli and Shelling Peas will be rotating through your shares. If you did not see them last week you will enjoy them this week.

Additional Onion Notes:


This week’s share includes our first harvest of onions for the season. These onions were planted in late October from transplants we started last year in late July. They are Sweet Spanish onions of two varieties – Siskyous Sweets and Walla Wallas. Some of the onions in this planting have started bolting. When a plant bolts it sends up flower stalk, then a bud and eventually, a flower blooms. Onions are a biennial plant meaning that they produce seed in their second year of life. Usually, some of the overwintered onions we plant bolt pre-maturely. The temperature fluctuations of our spring trick the onion into “thinking” it has gone into a second year. Once the onion puts up a flower stem, the energy of the bulb goes into this endeavor and the bulb starts to disappear. We harvest these bolting onions for an early taste of onions in the share because there is still a usable portion of bulb around the flower stem. You can use them as you would any sweet onion.

Recipes:


Green Garlic Soup
Adapted from Chez Panisse Vegetables

1 lbs green garlic, about 12 plants
½ lbs potatoes
2 medium onions – spring onions from your share will work
¼ lbs unsalted butter
Salt
2 quarts chicken or vegetable stock


To clean and prepare the garlic, trim away root end and peel away any tough or dirty outer leaves. Cut away tough upper portion of the green leaf. Lower portions of the green are fine to use. Cut the clean garlic into thin rounds or half circles. Peel potatoes and cut into half inch cubes. Peel and chop onions. Melt the butter, add onion and cook slowly until translucent and tender. Salt, add garlic and potatoes, cook these together for five minutes, add stock and bring to a boil. Lower heat to a simmer and cook the soup until potatoes are tender. Check seasoning. Can be served rustic and chunky, or pureed. Serves 6

Green Garlic Mayo
From Epicurious

2 eggs
½ tsp salt
1 tsp Dijon mustard
4 stalks green garlic, white and pale green parts chopped roughly
3 tsp lemon juice or rice wine vinegar
2 tsp more rice or white wine vinegar
1 ¼ cup canola oil


Whirl ingredients except oil in food processor. Slowly add oil while the food processor is running.

Kale and Walnut Pesto
Adapted from Farmer John’s Cookbook

¼ cup chopped walnuts
½ tsp salt
½ lbs kale coarsely chopped
2 cloves garlic minced – you can substitute green garlic here to make as garlicky as you like.
½ cup extra virgin olive oil
½ cup parmesan cheese
Ground black pepper to taste


1. Toast and chop walnuts in a dry heavy skillet over high heat stirring constantly, until they become brown in spots and become fragrant. Immediately transfer to a dish to cool.
2. Bring two quarts water to boil. Add salt and then kale. Cook kale until tender, about 10 minutes. Drain
3. Put garlic kale and walnuts in blender or food processor. Pulse until well combined. With blender or food processor running pour in olive oil steady and smooth.
4. When ingredients are combined transfer to a bowl. Stir in cheese, salt and pepper to taste and serve hot. Makes about 1 cup
 

Green Barley and Kale Gratin
Adapted from Vegetarian Cooking for Everyone

2/3 cup pearl barley, rinsed
Salt and pepper
1 large bunch kale, about 1 ¼ lbs
2 tablespoons butter
3 tablespoons flour
1 ½ cup milk or vegetable stock
¼ tsp allspice
1/8 tsp nutmeg
½ cup grated Gruyere or provolone


In a saucepan, add the barley to 1 quart boiling water with ½ tsp salt and simmer, uncovered until tender, about 30 minutes. Drain. While its cooking, cook the kale in a skillet of boiling salted water until tender, 6 to 10 minutes. Drain then puree with ¼ cup of cooking water until smooth.

Preheat oven to 375. Melt butter in small saucepan, whisk in flour and add milk. Cook, stirring constantly over medium heat, until thick. Season with allspice, nutmeg, salt, and pepper. Combine all the ingredients, check the seasonings, and then transfer to lightly buttered baking dish or ramekins.

Bake until lightly browned on top, about 30 minutes. If you use ramekins, run a knife around the edges, and then unmold them by giving them a sharp rap on the counter. Present them browned side up. Serves 4 to 6

Categories : CSA Newsletter, Recipe

CSA Newsletter: Week 3- June, 2 2008

Posted by csa on
 June 2, 2008


This Week’s Share


  • Arugula
  • Chard 
  • Garlic Scapes 
  • Lettuce
  • Radish or Turnips


Coming Soon:

Broccoli and Shelling Peas: You will see both these items in your share in the next week or so. They are both a crop that do not necessarily come to maturity all at the same time. Due to this nature we will rotate which pick ups get them throughout the next few weeks. If you do not see them this week you can expect to see them next week.

Recipes


Grilling Garlic Scapes

Just fire up your grill and toss the garlic scapes with olive oil and a pinch of salt, they take only a few minutes on the grill to become tender and are of a milder garlic taste than the green garlic.


Arugula Pesto Recipe
adapted from elise.com/ricipes

2 cups of packed arugula leaves
1/2 cup of walnuts
1/2 cup fresh Parmesan cheese
1/2 cup extra virgin olive oil
3 garlic scapes or 1 clove of garlic, minced


1. Toast the nuts in a pan over medium heat until lightly brown, or heat in a microwave on high heat for a minute or two until you get that roasted flavor. In our microwave it takes 2 minutes.

2a Food processor method (the fast way): Combine the arugula, walnuts, minced garlic into a food processor. Pulse while drizzling the olive oil into the processor. Remove the mixture from the processor and put it into a bowl. Stir in the Parmesan cheese.

2b Mortar and pestle method: Combine the nuts and garlic in a mortar. With the pestle, grind until smooth. Add the cheese and olive oil, grind again until smooth. Finely chop the arugula and add it to the mortar. Grind up with the other ingredients until smooth.

Because the pesto is so dependent on the individual ingredients, and the strength of the ingredients depends on the season or variety, test it and add more of the ingredients to taste.

3. Mix with freshly prepared pasta of your choice. You may need to add a little bit of water or more olive oil to mix the pesto more evenly with the pasta.

Makes enough pesto sauce for an ample serving of pasta for four people.


Braised Chard and Chard Stem Gratin
Adapted from Alice Waters’ “Chez Panisse Vegetables”


Braised Chard
Separate the leaves and ribs of a fresh bunch of chard. Wash, drain and cut the leaves. Slice a large sweet onion and several garlic scapes and stew in olive oil using a pot large enough to fit all the chard leaves.  After the onion and garlic scapes soften, add the chard leaves, season with salt and pepper, cover and stew for 20 to 30 minutes, stirring occasionally. After making this dish you can use your stems for Chard Stem Gratin.


Chard Stem Gratin
Remove their strings and parboil until tender, drain and arrange in a gratin dish with bits of fried pancetta, some chopped garlic scapes, chopped flat-leaf parsley. Cover with a bit of béchamel sauce or cream and gratineé in a preheated 450˚F. oven or under the broiler until golden.

Fettuccine with Swiss Chard, Currants, Walnuts, and Brown Butter
Annie Somerville “Fields of Greens ”


1/3 cup brown butter
1 tablespoon dried currants
2 tablespoons golden raisins
1 bunch red or green Swiss chard
1 tablespoon light olive oil
1/2 medium red onion, thinly sliced, about 1 cup
Salt and pepper
2 garlic cloves, finely chopped (feel free to substitute 4 garlic scapes)
1/2 pound fresh fettuccine
1/3 cup walnut pieces, toasted
Grated Parmesan cheese


Brown butter has a rich aroma and distinctive nutty, sweet flavor. This can be tossed with pasta or added to a hearty sauté of escarole, red chard, and kale. So make a batch and save it in the refrigerator for your future share with kale. Be sure to use unsalted butter and remove it from the heat before its amber color begins to darken. This butter holds indefinitely in the refrigerator. Melt the butter in a small saucepan over low heat. As the butter gently simmers, the butter fat and mild solids will separate from each other. The solids will settle to the bottom of the pan, coloring the butter as it cooks. When it turns a rich amber color, in about 8 to 10 minutes, remove from the heat. Line a fine-mesh strainer with a paper towel or cheese-cloth and pour the butter through it, straining out the solids. The butter can be used immediately or cooled and refrigerated in a sealed container. This recipe makes about 3/4 cup.

Set a large pot of water on the stove to boil Plump the currants and golden raisins in a small bowl covered with 1/4 cup hot water. Trim the stems from the chard and slice across the leaves to make 2-inch-wide ribbons. Heat the olive oil in a large sauté pan; add the onion, 1/4 teaspoon salt, and a few pinches of pepper. Sauté over medium heat for about 5 minutes, until the onion softens and begins to release its juices. Add the garlic, chard, and 1/4 teaspoon salt. Sauté for 4 to 5 minutes, until the chard is just barely tender, then reduce the heat to low.

When the water boils, add 1 teaspoon salt. Add the fettuccine to the boiling water, timing it to finish cooking with the chard. (The chard should be very tender but not overcooked when the pasta is done.) When the pasta is just tender, drain it immediately in a colander, shake off excess water, and add it to the onions and chard, along with the plumped fruit, walnuts, and brown butter. Toss together and season with salt and pepper to taste. Serve with freshly grated Parmesan.

Pizza with Mozzarella and Arugula
Janet Fletcher’s “Fresh from the Farmers’ Market”


Make enough dough for a 13- to 14- inch round pizza.


Topping:

2 tablespoons extra virgin olive oil
3 garlic scapes, minced
1/4 teaspoon hot red pepper flakes
Salt
1/2 pound low-moisture whole-milk mozzarella, coarsely grated
1 ounce arugula


In a small bowl, combine olive oil, garlic, hot-pepper flakes and salt to taste. Let stand for 30 minutes to marry flavors.
Spread cheese evenly over the pizza dough, leaving a 3/4-inch rim. Brush the rim with some of the seasoned oil, then drizzle more oil, including the garlic and pepper flakes, over the pizza. Reserve a little oil for brushing on the rim after baking. Immediately slide pizza from peel onto a stone and bake until the crust is crisp and browned, about 8 minutes. Remove from oven. Scatter arugula over the top. Brush rim of crust with remaining olive oil. Serve immediately.


Hazelnut-Garlic Scape Vinaigrette
Adapted from Annie Somerville’s “Fields of Greens”
This would be great over a nice plate of farm fresh arugula with radishes or turnips.

2 tablespoons sherry vinegar
2-3 garlic scapes, minced
1/4 teaspoon salt
2 tablespoons hazelnut oil
2 tablespoons light olive oil


Combine everything but the oils in a bowl, then slowly whisk in the oils.
Makes about 1/3 cup

Categories : CSA Newsletter, Recipe

CSA Newsletter: Week 2- May 26, 2008

Posted by csa on
 May 26, 2008


This Week’s Share


  • Braising Mix
  • Green Garlic
  • Lettuce
  • Mizuna
  • Turnips, Hakurei
  • Tomato Plants

Cherry Tomato Plants


Cherry tomatoes are wonderful snacks and great on salads. They are easy to grow and fun to pick in small quantities. However, they are very labor intensive to pick on a larger scale. For this reason we are giving you your own plant to enjoy. We concentrate on growing many different varieties of slicing, saucing and heirloom tomatoes which you will see in your shares starting at the end of July. We are also hoping that growing this plant will further connect you to your food source. It will probably be the most local food you will ever eat (unless the lettuce in your garden is closer to the back door).

Tomatoes appreciate full sun, and plenty of space to climb. Bury the plants deep so that only a little stem and the newest leaves are showing. Water them deeply. This will help to encourage a strong root system. They like a trellis to keep their leaves and fruit off the ground. Once established, tomatoes do not need to be watered more then once a week. Use about 5 gallons of water per plant. Tomatoes don’t like wet leaves so try to keep the leaves dry when you water.

If you do not have room to plant the tomato outside you can plant it in a five-gallon bucket with a drain hole. Keep it in a sunny space and remember to water frequently as container plants tend to dry out quickly.

Each share will receive one plant. If you wish have more they are $2 a piece. Here are the varieties to choose from:

Sun Gold
Intense fruity flavor.
Exceptionally sweet, bright tangerine-orange cherry tomatoes. Vigorous plants start yielding early and bear right through the season. The taste can’t be beat. This is an indeterminate variety which means the fruits ripen staggered over several weeks.

Peacevine
Seeds of Change Original Highest Vitamin C cherry tomato we’ve found. Uniquely high in gamma-amino butyric acid, a body sedative that calms jitters. Tresses continuously grow many delicious red (occasionally yellow) fruits.

Matts Wild
These small cherry tomatoes are packed with more taste than you can believe. Deep red, round fruits have a tender, smooth texture, and loads of sweet, full flavor with high sugar content . This is an heirloom variety. Teresa Arellanos de Mena, a friend of former Univ. of Maine AG faculty members Drs. Laura Merrick and Matt Liebman, brought seeds to Maine from her family’s home state of Hidalgo in Eastern Mexico. It’s the region of domestication of tomatoes, and where these grow wild. Matt gave us the seeds. This is an indeterminate variety which means the fruits ripen staggered over several weeks. – Johnnys Selected Seeds

Recipes


Green (Garlic) Goddess Dressing
Adapted from How it all Vegan! By Tanya Barnard & Sarah Kramer
This has a rich flavor and is great as a dip or dressing. You could put it on a lettuce and turnip salad, or a mizuna salad, or dip your turnips in it as a snack! If you don’t have all the ingredients (e.g. parsley) you could substitute another good herb like dill or try it without and just increase the green garlic for an especially garlicky taste!

    1/2 lb soft or medium tofu
    1/4 Cup olive oil or flax oil
    1 stalk green garlic (chop up the white end)
    1/4 Cup fresh parsley
    2 Tablespoon vinegar (I like apple cider best)
    1/2 Small onion
    1/8 teaspoon pepper
    1/2 teaspoon salt


In a blender or food processor, blend together all the ingredients until smooth and creamy.

Braising your braising mix
Braising is a cooking method that essentially combines sautéing and steaming. For a basic braise you will need:

Braising Mix
Green Garlic
Olive oil
1/8 Cup (approximately) Water or vegetable broth
Salt and pepper to taste


Finely chop up some green garlic (the white part of 1-2 stalks should do depending on your love of garlic). Coarsely chop your braising mix, keeping in mind that the greens will decrease in size by 1/2 to 2/3rds when you cook them. You can also cut off your turnip greens and add them to the braising mix if you want to see how you like them! Heat a frying pan on medium high heat. Add oil, and when it is hot, toss in the green garlic and braising mix. Stir the greens until they are just wilting and starting to brown. Add just enough liquid (water or veggie broth) to cover the bottom of the pan, cover the pan, and steam the mix until barely tender. Add salt and pepper to taste.


You can add soy sauce or peanut sauce or experiment with whatever spices to alter this basic braising recipe.


Mizuna salad with hakurei turnips, candied pecans, and maple-balsamic dressing

1/2 lb Mizuna (you could use your whole bunch, or just make a small salad for yourself).
5 hakurei turnips
1/2 Cup pecans
1/4 Cup sugar or maple syrup


To candy the pecans:
Cover the bottom of a skillet with 1/4″ water and heat on medium/high with sugar or maple syrup until the sugar dissolves. When the sugar is dissolved, add the pecans and stir fairly regularly until all the water evaporates and the pecans are covered in sticky sweetness. They will become crispy as they cool. Be sure to scrape them from the pan before they harden to the bottom.

Chop the Mizuna into a desired bite size. Thinly slice the white turnip bulbs so they are about as thick as quarters.
Toss the mizuna, turnips and pecans together.

Dress with maple-balsamic dressing:
This is a very simple, sweet but tart dressing. Recipe from How it all Vegan! By Tanya Barnard & Sarah Kramer

1/2 Cup Balsamic Vinegar
1/8 Cup maple syrup


Hakurei Turnips in peanut sauce:
These turnips are great fresh without any help, but they can be dipped in this sauce for a great snack, or they could be thinly sliced and served as a dish with this sauce drizzled on top.

2 teaspoons peanut oil
1 stalk green garlic, chopped
2 Tablespoons chopped ginger
1 Cup water (decrease water amount if you want a thicker dipping sauce)
2 Tablespoons soy sauce
1 teaspoon ground coriander (optional)
2/3 Cup smooth peanut butter
2 Tablespoons pure maple syrup
3 Tablespoons rice vinegar (other vinegars or lemon juice will work)
1/2 teaspoon red pepper flakes (alter depending on your spice factor)


Chop the garlic and ginger in a blender or food processor until fine. Add 1/2 the water and all other ingredients. Blend and add water until desired consistency is achieved.

What can I put in my Compost Bucket?


If you’re at one of the bulk pick-up sites you can participate in our compost bucket exchange. Take a clean bucket and bring it back the following week with whatever compost you generate that week.

Here are the basic guidelines for what can go in the buckets: Any vegetable material, including coffee grounds, citrus, etc., also egg shells, and small amounts of oils, fats, and dairy are fine. Just please no meat in your buckets. We don’t like plastic bags in the buckets; they’re hard to clean out. Please don’t put rubber bands or other non degradable items in the bucket, we end up having to sift them out and throw them away.

The most important thing is that you don’t hold onto a bucket for more than a week (and try to keep it in a cool place, out of the sun, during the week). After a week they start to get pretty smelly and that means they’re running out of air. This makes the compost from them less valuable.

New Faces in the Fields


With all the flats to seed in the greenhouse, seedlings to transplant, rows to hoe and produce to pick we have a new crop of energized apprentices planted out here on the farm. (Puns grow like weeds around here). This May, five new apprentices (see photo above) joined the three second season apprentices to begin learning all about organic farming this season. They are bringing great enthusiasm to growing your food. Brian, Blake and Michael continue on this year continuing to deepen their farming knowledge and are an incredible asset in keeping all our far systems running smoothly. You can find all of us out here working this beautiful land to produce beautiful food. Here are our new farmers to introduce themselves to you in their own words.

Nolan (3rd from left in picture above) was born and raised it the forests of central Indiana under the limestone cliffs of the Sugar Creek watershed. He has lived and grown food in California, Maine, Oregon, where he splits his time between filmmaking and farming. He also loves foxes.

Brooke (2nd from left in picture above) has recently returned home to Oregon after studying at Wesleyan University in Connecticut. She is excited to be learning some real skills on the farm and hopes to integrate environmental and social activism together her future.

Aaron (4th from left in picture above) is a young native Portlander who is excited about learning how to farm. He enjoys tree climbing, nature walking, and breakfast burritos.

Heidi’s (5th from left in picture above) background is in fruit production and research and while she is still passionate about fruit she is excited to learn all about vegetable production. She loves eating fresh produce with lots of garlic.

Matt (6th from left in picture above) lived his formative years near Cleveland, Ohio. Since graduating from Ohio University he has worked in both wilderness and residential therapy. Dedicated to learning the ways of organic farming, he is also passionate about playing music.

Categories : CSA Newsletter

CSA Newsletter: Week 1- May 19, 2008

Posted by csa on
 May 12, 2008

This Week’s Share

  • Arugula
  • Green Garlic
  • Joi Choi
  • Lettuce
  • Radishes

Recipes

Garden Lettuces and Arugula with Radish, Goat Cheese, and Hazelnuts
Adapted from the Fields of Greens cookbook.

Salt
¼ pound radishes, sliced into wedges
Light olive oil
Pepper
Sherry vinegar
Hazelnut-shallot vinaigrette (recipe follows)
9 to 10 cups of lettuce
Large handful of arugula
¼ cup hazelnuts, toasted

1 or 2 ounces mild, creamy goat cheese such as chevre or Montrachet, crumbled

Bring a small pot of water to a boil and add ½ teaspoon salt. Drop the radishes into the water and cook them for 3 to 4 minutes, until just tender. Drain and rinse the radishes under cold water, then toss with a little olive oil and a sprinkle of salt and pepper. Just before you’re ready to toss the salad, add a splash of sherry vinegar to brighten their flavor. Make the vinaigrette. Wash and clean the lettuce. Cut or tear the larger leaves and keep the small leaves whole. Mix the lettuce with the arugula; rinse the greens and dry them in a spinner. Combine the salad ingredients in a large bowl and toss with the vinaigrette. Sprinkle with freshly ground black pepper.

Hazelnut-Shallot Vinaigrette

2 tablespoons sherry vinegar
1 small shallot, diced
¼ teaspoon salt
2 tablespoons hazelnut oil
2 tablespoons light olive oil

Combine everything but the oils in a bowl, then slowly whisk in the oils.

Ginger and Green Garlic Joy Choi

Adapted from Vegetable Love

1 ½ tablespoons vegetable oil
1 head of joy choi, cleaned and coarsely chopped
2 quarter size slices peeled fresh ginger, cut into matchstick pieces (about 2 tablespoons)
1 or 2 stalks of green garlic, thinly chopped
1 teaspoon rice wine vinegar
¾ teaspoon kosher salt, or to taste

In a 10 inch frying pan, heat the oil over medium heat for 3 minutes, or until very hot. Add the joi choi, ginger, and garlic. Cook, tossing regularly with two wooden spoons, for 15 to 20 minutes, or until the leaves are completely wilted but the whites are still slightly crunchy. Keep the heat between medium and medium-high so that the pan is sizzling but the oil is not sputtering. Add the vinegar and salt. Cook for 1 minute more. Remove from the heat and serve.

Radish and Anchovy Open-face Sandwich

From Chez Panisse Vegetables

Choose a very fresh sweet baguette. Cut it in half lengthwise and spread liberally with unsalted butter. Wash and trim radishes, leaving on their tender leaves. Cut the radishes in half lengthwise and place them on the buttered baguette. Garnish with salt packed anchovy filets and ground black pepper.

Resource List

Here is a list of books we recommend having in the kitchen when needing some inspiration and/or direction on how to use your weekly share:

Fields of Greens, by Annie Somerville, and Vegetarian Cooking for Everyone, by Deborah Madison, have lots of great vegetarian recipes, along with any other cookbooks by the chefs from the Greens restaurant.

Chez Panisse Vegetables, by Alice Waters, has beautiful illustrations and great recipes highlighting vegetables.

Vegetable Love, by Barbara Kafka, was recommended to us by a CSA member, and contains tons of recipes, as well as excellent information for cleaning, storing, and choosing vegetables.

How to Cook Everything, or How to Cook Everything Vegetarian, both by Mark Bittman, are also great reference material, and generally just come in handy.

Farmer John’s Cookbook, by John Peterson, is unique in that it was written with CSA shares in mind, by Farmer John and others at Angelic Organics.

The Farm to Table Cookbook-the Art of Eating Locally, by Ivy Manning, is an appropriate new cookbook by a local Portlander. I have not had the chance to use it myself, but looks both beautiful and useful.

The Silver Spoon Cookbook, published by Phaidon Press, is an enormous and wonderful Italian cookbook, and an excellent source for recipes.

Here are also some useful websites:

www.epicurious.com is an excellent website compiling so many recipes from both Gourmet and Bon Appetit magazines. You can search for recipes by vegetable- just type in one or more vegetables you are hoping to use, and any recipes that feature those ingredients will come up. It is the first place to look on the internet.

www.recipesource.com is the “searchable online archive of recipes”, and contains many great recipes from around the world.

www.allrecipes.com and www.cooks.com have some more run-of-the-mill recipes, but they make up for it in quantity, with lots of recipes to search through.

Planning for the 2008 CSA Share

Long before you sit down to dinner and enjoy an ear of sweet corn or a ripe tomato, we have planned and plotted for the season’s share. The crop planning process for the share begins in December when we evaluate the season that has just finished. We look at a number of factors including; crop varieties, yields, planting dates and harvest dates. With the past seasons records in mind, we create an ideal share plan for the coming season which includes a week by week projection of what we will harvest and when. From here we work backwards to determine the tillage, seeding, and planting dates to achieve this harvest plan. We take the same planning steps to create a crop plan for the restaurants we sell to. The restaurant crop plan is created independently of the CSA crop plan.

We thought we would wet your appetites by sharing the CSA crop plan for the 2008 season. We also hope this will help those of you who share your CSA share to divide up the vegetables to your liking. While planning out the share this season, we paid special attention to planning for share amounts that are easy to find a recipe for. To achieve this we created a few distribution rotations. This means you may receive some crops less often but in an amount that will allow you to make a dish that focuses on the crop. The explanations below will tell you which crops will go out according to this plan.

Finally, we know you are aware that joining a CSA means expecting a little bit of farm adventure. Although we have a pretty mapped out plan, please remember that this plan is subject to all the factors of the season. Though we put lots of time and careful planning into creating the “ideal share”, sometimes Mother Nature gets the last say.

Here is your season from A to Z:

Arugula- A salad serving in the share – a couple of times in May and early June.

Asian Greens- In the spring you’ll get Joi Choi heads and Fuyoshomi heads, in the fall Tatsoi heads and Joi Choi heads again.

Basil- We are aiming for a one pound share for everyone once – hopefully enough to make a batch of pesto. Then another couple of smaller 6 ounce distributions.

Beans- In early June look forward to fava beans, followed by several harvests of snap beans through the season.

Braising Greens- Twice in the spring and once in the fall.

Broccoli- We will harvest broccoli in June and July. We’ll try to distribute about eight pounds per share over this period.

Brussels Sprouts- You’ll have to wait till November to see these in the share a couple of times. Some good cold nights will make them all the sweeter.

Cabbage- A couple heads in July for your summer slaws. Then a couple more heads in the late fall for soups and sauerkraut.

Carrot- After a lot of damage from the carrot rust fly in the 2007 season, we are hoping some of the strategies we have put into place this year will make for a bountiful and beautiful carrot harvest. The plan is for carrots most weeks starting in mid June until the end of the season.

Celeriac- Look for this celery flavored root in November and enjoy it at your Thanksgiving table.

Celery- September and early October, about three times.

Chard- A few times in late May until mid July, then back again in late September and October.

Cilantro- Mid August to mid October.

Corn- Sweet corn debuts in late July or early August. Nine consecutive plantings will show up in your share in mid-summer to early fall.

Collards- November, a couple of times.

Cucumbers- After the first cucumber harvest in late July, cucumbers will be in the share every other week switching off with summer squash. Our hope is to give you a more usable amount of cucumbers rather than a smaller amount more frequently.

Dill- Mid August to October.

Eggplant- Every other week from mid August until early October either Japanese or Italian eggplant will be in your share.

Fennel- These delicious bulbs will be in the share twice in June and twice in October.

Green Garlic and Garlic- Green Garlic will be in the share in the first month of CSA. In late June to early July you’ll start to see the first mature garlic bulbs. These will be in the share through the end of the season. If you share your CSA share we suggest that you switch off with your share partner in taking home the garlic bulb each week.

Kale- Kale switches off with chard in the share from late May until mid July. It returns to the share again in October alternating with chard and collards till the season’s end.

Leeks- Leeks alternate with onions in the share from mid September till the end of the season.

Lettuce- Lettuce goes out in the share most weeks of the season until the end of October. From the beginning of the season until about mid-July, there will be two heads per week in the share. For the next couple months there will be one head per week, returning to two heads per week in late September until the end of lettuce season at the end of October.

Melons- The melons start to ripen in mid-August. We are growing five melon varieties this year and will try to give you a taste of each of them.

Mizuna- A salad serving in the share – a couple of times in May and early June.

Onion- You will see a variety of onions in the share over the season. Walla Wallas start off the fresh onion season in June with other fresh onion varieties to follow – Purplettes, Red Torpedo Onions, and more Wallas. In September the cured onions begin. Red or yellow storage onions will be in the share, alternating with leeks from early September till the end of the season.

Parsley- About once a month from June thru October.

Parsnips- Look forward to these delicious roots a couple of times in November.

Peas- Our plan for this year is for one distribution of shelling peas in early June.

Peppers- Green peppers will be in the share a couple of times in late August and early September. Colored peppers last about six weeks from mid September till the end of October.

Potatoes- The SIO tradition is to start the potato season with a mix of red, white, and blue new potatoes just in time for the 4th of July. They will reappear in the share a few more times through the summer before being on a regular bi-monthly distribution schedule.

Radish- Twice in the spring to add a little spice to the share.

Shallots- In November, a couple if times, four per share.

Spinach- Spinach is a tricky crop for us. We have had so much trouble with low germination when we direct seed spinach that we now transplant our spinach crop. At three beds with 1800 plants in each bed, it takes a long time to plant. Our plan for this year is for one big spinach harvest in the spring and another in the fall.

Summer Squash- It is easy to be overwhelmed by the explosion of zucchini, patty pans, and yellow straight neck squash that summer can bring upon us. After a few smaller distributions of summer squash, you will start getting summer squash every other week (alternating with cucumbers) in a larger amount.

Tomatoes- We grow sauce, slicing, and heirloom tomatoes at SIO. Sauce tomatoes will be in the share in September and October. You will receive about five pounds in two separate distributions. Slicing tomatoes will be in the share about every other week – enough to make a salsa or tomato based recipe.
Heirlooms will go out each week of tomato harvest for slices on summer sandwiches and salads.

Turnip- We planted twice as many Hakurei this year since last year’s yields were lower than we would have liked. We are hoping to have enough for two spring distributions and one fall distribution. There will also be Scarlet Queen turnips in the fall.

Winter Squash- Winter Squash starts making it’s appearance in early October and sticks around for the rest of the season. You will receive two to four squash per distribution. This should make it easy to split with share partners. The only exception to this will be Blue Hubbard squash, just one of these.

Categories : CSA Newsletter

CSA Newsletter: Week 30- December 3, 2007 (composed by Shari)

Posted by csa on
 December 3, 2007


This Week’s Share

  • Cabbage
  • Carrots
  • Celeriac
  • Collard Greens
  • Leeks
  • Onions
  • Parsnips
  • Potatoes
  • Pumpkin
  • Shallots
  • Winter Squash

Cabbage- Melissa is a crinkle-leaved savoy cabbage. It is perfect for slaw and salads.

Carrots- The carrots just get sweeter and sweeter. Although not perfect because of the rust fly damage they continue to be delicious. As we crop plan for next season we are talking about what pest management practices we can put into place to minimize this problem. The first step is always trying to choose more resistant varieties so we will be trialing a few new types for 2008.

Celeriac- Celeriac also known as celery root is grown for its edible bulbous root crown. Do not be put off by its rough exterior; inside is a surprisingly delicious and versatile vegetable. Celeriac has an excellent crisp texture raw or cooked, and super concentrated celery flavor that enhances its usefulness as both vegetable and seasoning. Peeled celeriac will darken when exposed to air. To slow this process, toss with lemon juice or keep in water. Lemon juice can also be added to cooking water. Raw celeriac is excellent. Try celeriac sticks tossed in your favorite dressing or grate it raw into a salad.

Collard Greens- Cook a bit longer then you would kale and enjoy this nutritional green. See recipe below.

Leeks- Leeks can be substituted in any recipe that calls for onions. They are slightly milder then onions and do take a bit longer to become tender when sautéing. They are a welcome addition to any winter soup.

Onions- These Copra Onions will store for many weeks.

Parsnips- Parsnips are another root vegetable that sweeten with the frost. A simple root vegetable roast is a wonderful way to enjoy all the roots in your share. Cut your parsnips, carrots, potatoes, celeriac, beets (if you have any left from last week) into one-to-two inch cubes. Coat with olive oil and sprinkle with salt to taste. Roast at 400 degrees until tender.

Potatoes- Roasted, mashed, baked, fried potatoes must be one of our most versatile vegetables around.

Pumpkin- Snackjack pumpkins produce hull-less seeds that are ideal for roasting. The flesh is tender and sweet perfect for pie making.

Shallots- Another allium that can be used like onions or leeks but its milder flavor allows it to be incorporated raw into sauces and dressings.

Winter Squash- The two varieties in your share this week are Sugar Loaf which is a Delicata variety and Blue Ballet which is a Hubbard variety. The Sugar Loaf can be sliced into circles, the seeds scooped out, coated with olive oil and a little salt and baked at 400 degrees until tender. You can eat both the flesh and skin. The Blue Ballet once baked can be incorporated into soups or curries.

Recipes

Winter Squash Gnocchi
Serves: 4

1 winter squash
rosemary (optional)
2 eggs
1 1/4 c plain flour
1/2 c freshly grated parmesan
6 T butter
a little freshly grated nutmeg.

1. Segment the squash and scrape out the seeds. Rub with a little oil and roast in a medium oven with a few sprigs of rosemary for about 45 minutes until just soft but not browned. Scoop the flesh from the skin.

2. Put a large pan of salted water on the boil. Beat the eggs with salt and pepper and mix with the squash, flour, nutmeg and about two thirds of the parmesan to make a dry dough. The easiest way to do this is using your hands and squeezing handfuls through your fingers.

3. Take a handful of dough and with dry hands role into a 1/2 inch wide log on a well floured surface. Cut into 1 inch long sections and when you have a plate full drop them into the rapidly boiling water. They are cooked when they rise to the top.

4. Scoop them out with a perforated spoon and gently fry in a pan with the melted butter until they start to color. Serve with a sprinkling of parmesan and perhaps some chopped herbs.

Potato and Celeriac Puree
Serves: 4

2 cloves garlic, peeled
1 cup of cream
4 potatoes, peeled
1 celeriac
hot milk (optional)
salt
fresh ground black pepper

Put garlic cloves in cream and simmer gently until quite soft, then puree with the cream. Cook potatoes until tender, then drain. Cook celeriac in boiling water and also drain. Pass celeriac and other ingredients through a food mill or food processor. Beat in a little boiling milk with a wooden spoon if puree is too stiff. Adjust seasoning. Reheat puree in a covered bowl in a microwave or in a steamer, top with carmelized shallots and serve.

Caramelized Shallots
Milder than onions, shallots are used widely in Asian cooking as well as French. They are useful chopped finely and then allowed to soak in a little red wine vinegar and sugar. This makes a great base for a salad dressing or salsa. The following dish is great served with steak and roast vegetables or on your mashed potatoes and celeriac.

1 tbsp butter
4 shallots
4 sprigs of rosemary
1 tsp sugar
6 oz red wine
1 tsp balsamic vinegar

Heat butter in a pan and add shallots – toss until they are browning – add rosemary and cook until shallots are starting to caramelize. Add sugar, dissolve and add wine and vinegar. Cover and simmer for about 20 minutes. When you are about to use, uncover and reduce liquid until shallots are shiny and have a syrupy glaze.

Citrus Collards with Raisins
Recipes from America’s Small Farms

1 bunch collard greens
Coarse sea salt
½ tbsp extra-virgin olive oil
1 garlic clove, minced (or sub shallots)
1/3 cup raisins
2 medium oranges

Remove the stems from the collards and discard. Stack four or five leaves on top of one another. Roll the leaves into a tight cylinder. Slice crosswise, cutting the leaves into thin strips. Rinse the leaves in cold water and drain in a colander.

In a large pot over high heat, bring 3 quarts water to a boil and add 3 teaspoons salt. Add the collards and cook, uncovered, for 10 minutes. Remove, drain, and plunge into a bowl of ice water to stop the cooking and set the color of the greens. Drain

In a medium sauté pan, over medium heat, warm the oil. Add the garlic or shallots and sauté for 1 minute. Add the collards, raisins, and a pinch of salt. Sauté for 3 minutes, stirring frequently. Section the oranges, reserving the juice. Add the oranges and juice and cook for an additional 30 seconds. Do not overcook (collards should be bright green)

Serve immediately or at room temperature.

2008 Sign-up

Please remember that December is current member re-sign up month. Please fill out the 2008 Community Farm Agreement and mail in your $100 deposit to secure your slot. The cost for the CSA in 2008 will be $845.

Field Notes

It’s hard to believe this is the last week of CSA. It has been a real pleasure to have the opportunity to nurture this produce so it can in turn nurture your family. Please enjoy this last, winter-hearty share! Best wishes for a safe, healthy and festive holiday and winter season.

Although a lot of things slow down on the farm after the CSA season is over, there is still a lot that needs to get done. The list of winter chores, activities and projects is growing steadily. To begin, the fields need to be cleaned up. This consists of removing all the floating row cover fabric from the fields, rolling it up and storing it in the barn as well as removing all the hoops from the fields too. All of the irrigation has to be removed from the fields as well. The drip ‘tape’ gets rolled back onto spools and stored safely in the barn for the winter so it can be used in the years to come. We also have to clear all the trellising (metal stakes and bamboo) from the tomato, pepper, eggplant and cucumber fields. Then at the end of January we start seeding in the greenhouse and the whole cycle starts over again. Most of the farm planning goes on during the winter as well. The managers stay busy reviewing this past year, planning the crops for next year, placing next year’s seed order, and laying the groundwork for the year ahead. The apprentices will spend the winter working on their Independent Winter Projects, gaining more farming knowledge through seminars and working on the long list of farm projects.

Where to get fresh, local food through the winter

Just because the CSA season is ending doesn’t mean your supply of fresh, seasonal and local food has to dry up. There are a variety of ways to continue to share in the harvest for the next few months. For starters, there are still three more Saturdays to enjoy the Portland Farmer’s Market on the South Park Blocks. The Hillsdale Farmer’s Market operates every other Sunday from November through April, and weekly during the spring and summer. People’s Food Co-op in SE Portland offers a weekly farmer’s market every Wednesday from 2-7. You can, of course, always visit local co-ops and grocers that offer local and seasonal produce.

Categories : CSA Newsletter, Recipe

CSA Newsletter: Week 29- November 26, 2007 (composed by Josh)

Posted by csa on
 November 26, 2007


 This Week’s Share

  •  Beets
  • Braising Mix
  • Brussels Sprouts
  • Carrots
  • Kale
  • Onions
  • Turnips
  • Winter Squash

Beets – Your red beets this week are Kestrel. Kestrel was one of the first beet seed varieties offered organically by our seed suppliers, probably about five or six years ago now. We tried it out because it was organic and kept it because it tasted great.

Braising Mix – There was finally a really good freeze last week. This is a mix of the adolescent greens that made it through that freeze and are sweeter for it.

Brussels Sprouts – Brussels are one of the crops that really tastes noticeably better after a hard frost. Most of the commercial Brussels sprout production in this country is done in costal California, where temperatures are cool, but where it also rarely frosts. This is too bad because it means most people will never get to experience the frost sweetened sprouts you have in your share this week. Consequently most people turn up their noses at them, very sad.

Carrots – We grow a few varieties of carrots but they are all orange Nantes types. Nantes types are typically the sweetest with the best texture, delicate tops and relatively short roots. Interestingly carrots did not start out with orange roots. According to the World Carrot Museum, carrots were bred to be orange by Dutch seed breeders in the 16th century to honor The House of Orange, their royal house. There are still varieties that are available today in white, yellow, red, purple and black, but the orange carrots are by far the most popular.

Kale – Kale can taste almost like candy after a hard freeze. Many winter greens concentrate sugars in their cells during cold snaps. The sugar acts as antifreeze and protects the plant. I read a restaurant review last winter where the reviewer complained that there was too much sugar added to their dish of greens. I’m pretty sure that reviewer had no idea that’s the way freshly harvested greens taste this time of year in Portland.

Onion – This has been one of the nicest crops of onions I can remember on the farm; big, even onions and lots of them. They’ve been storing on racks in the barn and if you don’t get to them immediately they should keep in the cupboard for a few months with no trouble.

Turnips – We used to grow Purple Top turnips, which are the standard American/European type. They never did all that well for us and weren’t so popular either. Then we started growing Hakurei, the beautiful sweet, white turnips you saw in the spring. In the fall we also grow Scarlet Queen which is closer to Hakurei but is a little heartier than the delicate white roots. The Scarlet Queens came up thinly this year and have produced much larger roots than we’ve ever seen before. They’re beautiful and would be excellent in a root roast, or sliced thinly and sautéed in butter or olive oil.

Winter Squash – Butternut squash is up this week. Butternut takes a while to sweeten up in storage so we give it out a little later than some of the others. With a small seed cavity it’s a variety with lots of very smooth, rich flesh and a thin, delicate skin. Because of the texture, butternut is perfect for soups and sauces. Or you can just eat it with butter and maple syrup which was my favorite growing up.

Recipes

Over the past few years I’ve started using cookbooks less and less for recipes, and more and more for ideas and inspiration. I keep collecting new ones, and we have two full shelves of them at home, but there are a handful that I come back to again and again for certain proportions I can never remember, or for their beautiful photos that inspire me when I’m having trouble figuring out what I want to eat. Here’s a list of some of my favorites:

Lorna Sass’ Complete Vegetarian Kitchen – This book has some good recipes, but it’s even better as a reference book for grain and bean cooking times. I used it for a few years before getting a pressure cooker and it was good, but now that I have a pressure cooker it’s indispensable. The pressure cooker is amazing for fast soups, making stock, beans (of course), and risotto!

Taste of the Mediterranean by Jacqueline Clark and Joanna Farrow – This is a picture book with beautiful photos and simple recipes. It’s most useful in the summer months, but inspiring any time of year and probably the most dog eared book I own.

Local Flavors by Deborah Madison – Deborah Madison has great recipes and this book is very seasonal with lots of recipes for “odd” vegetables, and fall and winter vegetables. Her “Vegetarian Cooking for Everyone” is also a great book.

World of the East Vegetarian Cooking by Madhur Jaffrey – If you want to explore some eastern flavors and techniques, this book has great recipes. Most of the preparations are very simple and the instructions are very clear. There are wonderful notes on the use and regional variations of the dishes as well.

Carluccio’s Complete Italian Food – I love Italian food and this book is complete but concise. It’s more of a condensed encyclopedia than a cookbook but there are a few recipes as well as lots of general notes on traditional preparations that go well beyond what most of us think of as Italian food.

One last source I’ve used quite a bit over the past several years is Gourmet Magazine. This was a big surprise to me at first. I was given a subscription as a gift and immediately thought it would be too snooty and meat intensive for my pescatarian diet. It turns out to have the best vegetable recipes of any food magazine I’ve ever read, and is very seasonal as well. There’s quite a bit of good writing between all the advertisements as well.

So, if your cookbook shelf is lacking, anyone of those would make a great addition and help with using the CSA share. I’ll share a few of my versions of the recipes and preparations that stick with me from those books below.
 

Balsamic Brussels

Brussels sprouts
Olive Oil
Balsamic vinegar

To decide on portions I usually think about how much I want to put on the plate and then multiply that by the number of plates. For five or six people I would clean about 25 sprouts. Clean the Brussels by cutting the sprouts off the stalk and peeling away any damaged leaves. If the sprouts are medium to large cut them in half or quarters.

Heat a tablespoon or so of the oil in a large pan (with a lid) on medium high. When the oil is very hot toss in the sprouts and stir them to coat the oil. Cook them for a minute or so, stirring occasionally. Quickly sprinkle a tablespoon or two of balsamic vinegar over the top of the sprouts and add about 1/4 cup of water and then put the lid on to close in the steam. Steam the sprouts for about five or six minutes until they are cooked through but still bright green. If the liquid is mostly gone you can just pour them out into a serving dish. If there is still quite a bit of liquid lift the sprouts out and cook down the liquid until it is mostly gone and then pour it over the sprouts.

Braising mix with Turnip

I would prepare these very similarly to the Brussels. I really like balsamic vinegar with brassicas. If you prefer salty flavors ume plum vinegar and tamari would be good as well.

Slice the turnip into 1/4 inch round and then cut the rounds into halves or quarters. Sauté the pieces in butter or oil (sesame oil would be good with the ume plum) until the turnip is just tender. Add the braising mix with a little vinegar or tamari. Stir the mix while cooking for just long enough to wilt the greens and soften the stems.
 

Simple Butternut Soup

This is especially easy for those of you with a pressure cooker, but it’ll work as well, just a little more slowly with a normal pot. Slice an onion into 1/8 inch rounds and cook over medium high heat with butter or olive oil until it is translucent and almost brown – really this is very flexible, you can use as little or as much fat as you like and cook the onion as dark as you like. If you’re using less fat stir more and perhaps even add a little water at the beginning to keep things from sticking. If you’re cooking the onion to the point of caramelizing you’ll need to either turn the heat down or stir a little more. You can add some herbs if you like while the onion is cooking. I like thyme and oregano.

Once the onion is cooked toss in a couple of cups of cubed butternut. More will make more soup, less will make less. The skin can be on or off. Stir the butternut in and then add enough water to cover the squash by about 1/4 – 1/2″. Add salt to taste (if you like salt) and then put the lid on and if it is a pressure cooker bring it up to pressure for five minutes. If you don’t have a pressure cooker just simmer the pot until the squash is very soft.

Puree the soup in a blender or food processor in batches. If you want to leave some chunks only process part of the soup. That’s it, very simple.

If you have already cooked, leftover winter squash the process is even simpler, just add that to the cooked onion with the water, heat it up and then puree without cooking further. The recipe works great with leeks or shallots as well, and vegetable stock in the place of water will make the soup more flavorful.

I hope that’s all helpful. Enjoy the veggies and if you can’t use them all right away just store them in plastic bags in the fridge. Winter vegetables, other than leafy greens, will keep for quite a few weeks that way. Onions and winter squash just need a dry spot out of the sun.

Field Notes

It is getting a little slick out in the fields and with the rain forecasted for this week it will probably get even slicker. This time of year we’re really careful about always parking the harvest truck in a spot where there’s a firm downhill start so that minimal traction is needed to start the thing rolling.

There’s a lot of clean up happening in the fields right now. There’s harvest too, but even that takes more cleaning with all the mud caked roots and frost damaged leaves. Many mornings the crew has to wait for the plants to thaw before starting harvest. When harvest is finished there’s still drip irrigation to pick up from the summer and trellising to take down. We’ve been done with both for a couple of months now but there’s been too much planting and harvesting up to this point to get it up out of the fields.

Back in the office planning is well underway, but this year I’m more in clean up mode myself, stepping aside while Tanya takes over the task of getting the seed order ready for next year. After seven great years at Sauvie Island Organics I’m finishing up and looking for the next step in my vegetable production career. I’ll still be in Portland, trying to start a much smaller, solo operation with a focus on unusual vegetables, beans, grains and seeds. I’m still working out the details, even the location, but it’s exciting for me, in both the invigorating and terrifying senses of the word. I’m also hoping to do some consulting for up and coming growers so if any of you harbor dreams of turning your backyards into vegetable paradises let me know.

Meanwhile I’m appreciating my last days at this incredible farm and I’m trying to leave things where Shari, Tanya, Scott, and Shannon can find them all.

2008 Sign-up

As we feast on the bounty of 2007, it is not too early to start thinking about the 2008 season. Please fill out the 2008 Community Farm Agreement and mail in your $100 deposit to secure your slot. After doing all our budget number crunching we are not able to offer the discounted share for 2008 and still make our budget. This is affected mainly by the increase in fuel prices. The cost for the CSA in 2008 will be $845.

Dry Beans Available

Select from ten varieties of beautiful and tasty heirloom beans organically grown on Sauvie Island by former SIO apprentice Amber Baker. Each variety has been carefully grown and processed by hand and comes in a one-pound bag. $6.00/bag. Email SIO with your order including varieties you would like and how many pounds of each. We will have them available for pick-up the week of December 3, 2007. Please make checks payable to Amber Baker and bring the check to pick-up on December 3, 2007.

Amber’s Heirloom Beans:

Golden Appaloosa- This full kidney shaped bean comes to our farm from a seed exchange in California. Enjoy its rich golden color and hearty flavor.

Black Calypso- Sometimes called “yin-yang” for its distinct markings or “Orcas” for its signature “eyes.” A round coco-shaped bean, perfect in cold salads or baked.

Vermont Cranberry Mix – A usual standard, this season’s Vermont cranberries mixed with several of our trial varieties yielding a beautiful array of beans you’ve never seen before. A ready-made mix of soup beans.

Black Coco- A large oval round very shiny black bean. This variety is good for making a rich and hearty black bean soup.

Tongue of Fire- A large kidney-shaped bean with a fresh green bean flavor. Try this one as a bed for your next meat or vegetable entrée.

Monos Negros- A smaller bean than the Black Coco, this variety is more of a deep dark purple. Use this in your fresh corn and bean salad or blended into a black bean spread.

Lowe’s Champion- A round red bean brighter than the normal kidney. Try this variety in place of kidneys in all of your favorite recipes.

Red Calypso- Half-maroon and half-pearl white, Red Calypso is hard to find in the marketplace. Nice texture used as a baking bean.

Peregion- A native to Oregon this bean has a full nutty flavor that makes it one of our favorites. These multi-patterned beans hold their markings through cooking.

Jacob’s Cattle Bean- With a creamy texture this burgundy and white mottled bean is known for its ability to absorb flavor.

Categories : CSA Newsletter, Recipe

CSA Newsletter: Week 28- November 19, 2007 (composed by Blake)

Posted by csa on
 November 19, 2007


This week’s share

  • Brussels sprouts
  • Carrots
  • Collard greens
  • Onions
  • Parsnips
  • Pumpkins
  • Potatoes
  • Winter Squash

Brussels Sprouts- One of the more unusual, and I think one of the most delicious plants in the cabbage family, Brussels sprouts are in your shares for the first time this week. If your kids don’t want to eat them, you can tell them that the world record for speed eating is 44 heads in a minute and see if they’re up for the challenge. Remove outer leaves, slice in half or leave whole, steam until tender, and then sauté with some chopped bacon, garlic, shallots, and peeled chestnuts.

Carrots- No surprise here. Try tossing your carrots in olive oil, garlic, and onion and bake them at 375 degrees for about 25 minutes for a nice and healthy side dish this Turkey Day.

Collard Greens- Oh, how do I love collard greens? Let me count the ways. Try cooking these leaves a bit longer than you would kale or chard. Someone on the farm claims to have seen a study stating that when all vegetables were analyzed for their nutritional value, collards were the healthiest on Earth! I never would have guessed what the healthiest fruit was, either…..guava!

Onions- Copra onions are great for any recipe you might be using this Thanksgiving calling for yellow or white onions.

Parsnips- Parsnips add such a great flavor to soups and stocks. They are also a welcome addition to any root vegetable roast. This week I made a ton of mashed vegetables with potatoes, parsnips, and rutabaga, so if you still have your rutabaga from last week you can throw it in. Just chop the rutabaga in pieces half the size of the potato and parsnips and boil for 20 minutes until everything’s soft. Then mash it all up with butter, cream, and sautéed garlic and shallots. Also, check out my recipe below for a delicious parsnip dessert!

Pumpkins- Speaking of dessert…pumpkin pie is definitely one of my favorite things about Thanksgiving, and I’m sure I’m not alone on this. These baby bear pumpkins are sweet and delicious, perfect for pie.

Shallots- You can substitute shallots for onions in just about any recipe and it will add a new and distinct twist to an old favorite. Their flavor is so subtle and wonderful, they are especially nice complimenting simple recipes where they can really shine. Check out the suggestions for using them with Brussels sprouts and parsnips above.

Winter Squash- This week there will be one large Hubbard squash in your share. We grow a variety named “Blue Ballet”. It is a beautiful pale blue color with an elegant teardrop shape. The flesh of this squash is a bit firmer than the other varieties, and the flavor is really great. Check out the recipe directly below for stuffed squash.

Recipes

Stuffed Hubbard Squash
This is a recipe courtesy of Josh, who works with us on the farm and is vegetarian. If you or anyone at your table this holiday is vegetarian, this makes a great veggie alternative to the turkey. Josh calls it stuffed hub-bird, and it is so simple and tasty you might even consider skipping the hassle of roasting a turkey!

1 Hubbard squash
Plenty of your favorite vegetarian stuffing…or see recipe below

Preheat oven to 350 degrees. Cut a circular hole around the base of the squash just big enough to fit your hand in, as you would for a jack-o-lantern pumpkin but on the opposite side of the fruit. Remove the plug and scoop out the seeds, then stuff the squash with the stuffing and return the plug to the hole. Place the squash on a greased baking sheet and bake for about an hour and fifteen minutes, until you can easily stab a fork through the skin of the squash.

That’s all there is to it!

Here are some simple instructions for a stuffing…
Sauté onions, leeks, shallots, or any combination of all three in butter until golden yellow. Transfer to a mixing bowl and add a few cups of crumbled, day old bread or cornbread. Add herbs and seasoning, like sage, parsley, thyme, salt, and pepper. Moisten with vegetable broth and you’re ready to go.

Stuffing instructions adapted from www.ladyshrike.com.

Parsnip and Pear Ginger Hazelnut Crumble
I tried this dessert at the tasting counter at New Seasons a little while ago, and it was so delicious I took the recipe flier and wanted to pass it on. Strange as it may seem, I thought the hardy flavor of the parsnip was delicious in a dessert. It would make a great dessert to share the table with the pumpkin pie this Thanksgiving.

Crumble Topping

½ cup flour
1/2 cup brown sugar
1/2cup cold butter, cubed
1/2 cup hazelnuts
1/4 cup crystallized ginger
1 tsp nutmeg

Pear and Parsnip Filling

5 pears, peeled, cored, and cubed
4 medium parsnips, peeled and grated
1/2 cup brown sugar
1 tsp. vanilla
1 tsp. ground ginger
1 tsp. cinnamon
1 tsp. Salt

Preheat the oven to 350 degrees. Pulse crumble ingredients in a food processor until a coarse crumb forms. Set aside. Combine filling ingredients in a medium bowl until well blended. Spread filling in a 9×13 baking dish. Top with crumble. Place on middle oven rack. Bake 30 to 40 minutes until cooked through and crumble is browned.
Adapted from New Seasons’ recipe.

Pick-up Notes

Thanksgiving Week Pick-up

SE Ankeny, SE Elliott, Friendly House and Farm
Pick-up will be Tuesday November 20, 2007.
Same place, same time only please come on Tuesday.

Ecotrust, Metro, PSOB and St John
Pick-up will be Wednesday November 21 boxes will be available by noon.

A note to members who receive boxed shares

If you have any of our empty blue and purple bins taking up space around the house, please return them as soon as possible! We are really short on bins right now and are having to resort to emergency measures. Thank you!!

Field Notes

Have fun with your family preparing fresh, local produce this Thanksgiving!
Out at the farm, things have been very gradually slowing down ever since the madness of September, but now we are finally at a good place to take a few days off. The onions and garlic are in the ground, we just finished planting all of our winter salad greens, and although there is plenty of tidying up and random jobs to do, we are finally at a place where we can relax for a bit, which feels really good. I know I am excited to unwind and spend some time with my family and friends. We are also beginning to look ahead to the coming winter, so Brian, Michael and I are in the process of selecting and planning for our Independent Winter Projects, which as apprentices will keep us busy in the coming months when there is less farming to do. Shari, Tanya, Shannon, and Scott, as our fearless managers, are starting to roll up their sleeves and get busy with all of the planning that is necessary for next season.

Two Great Ways to Give This Season

The Sauvie Island Scholarship Fund helps low-income families join the CSA. We believe everyone should have access to fresh locally grown produce. The scholarship fund helps make this a reality. A family can apply for up to half the share amount in scholarship dollars. In 2007 the fund supported 10 families. 21 adults and 23 children received farm fresh produce because of the generous contribution of community members like you.

The Sauvie Island Center is a 501c(3) non profit that teaches youth and adults about farms, the food they grow and the landscape in which they exist. Sauvie Island Organics is a proud partner. Through the Sauvie Island Center’s field trip program thousands of students k-5 have visited our farm fields to gain a better understanding of how food is grown. The Sauvie Island Center was recently awarded a three year grant by Organic Valley. There will be some information in your share this week about the Sauvie Island Center and a fun gift from Organic Valley. We hope you enjoy this creative deck of Earth Dinner cards and use them to help you share stories and laugh with family and friends as you come together this Thanksgiving holiday.

Categories : CSA Newsletter, Recipe

CSA Newsletter: Week 27- November 12, 2007 (composed by Brian)

Posted by csa on
 November 13, 2007

This Week’s Share

  • Carrots
  • Celeriac
  • Escarole
  • Kale
  • Leeks
  • Potatoes
  • Rutabaga
  • Tatsoi
  • Winter squash

Carrots – True to form, carrots are a winter vegetable staple, and because of the recent frost, they’re only getting sweeter.

Celeriac – This is a new addition to this week’s share. Celeriac is a form of celery grown for its root, rather than its stalk. Try it in this week’s recipe for potato, leek and celery root soup. Tip: celeriac root discolors if prepared in advance, unless it’s covered with acidulated water.

Escarole – The tender inside leaves of escarole are good in salads, while the tougher outside leaves stand up well to sautéing with chard, beet greens or kale. They are also tasty when prepared with citrus fruits, apples, and pears. (note: if you want to remove the bitterness, soak the cut leaves in ice water for thirty minutes before using)

Kale – Kale is an ancient member of the cabbage family. It’s a hearty cold weather green whose flavor becomes sweeter with a touch of frost. In addition, it’s an exceptional source of calcium, iron, and vitamin A.

Leeks – This week we’re moving from the King Richard variety to the Tadorna variety. This is a new variety of leek that hasn’t been in the share until this week. They go great in potato leek soup!

Potatoes – Potatoes are considered one of the most completely nourishing foods if eaten with the skins intact. Their rich potassium content is good for those who have eaten too much salt and high sodium foods. This week you’ll be receiving Canela potatoes. Canela has russeted skin and a dry starchy interior that soaks up flavors. It’s a new variety out of Colorado that’s particularly suited to organic production (formerly called AC92009).

Rutabaga – Rutabagas are an excellent late-season root crop. They are bigger and heartier than the common turnip. With a little butter and salt you’ll be able to tame this beast into a tasty treat.

Tatsoi – This little green plant with crisp spoon-shaped leaves and sweet crunchy stalks is delicious in salads, and loves to be sautéed with garlic, ginger, and a splash of soy. Tatsoi is a cold, hearty plant that grows well in the early spring and late fall, and it’s so tolerant of cold temperatures that it can even be grown under the snow!

Winter squash – This week’s variety of winter squash is the Delicata Zeppelin. These tasty little treats are delicious baked with butter and pure Vermont maple syrup. This noble vegetable gets us through the fall and winter each year. The names alone are wonderfully appetizing, such as the Delicata Zeppelin.

Recipes

Potato, Leek, and Celeriac Root Soup

Adapted from Anne Somerville’s “Fields of Greens” cookbook

Yields 8 to 9 cups

  • 6 cups vegetable stock
  • 1 medium-size celeriac root, about 1 pound
  • 2 pounds potatoes, peeled and thinly sliced, about 7 cups
  • Salt and white pepper
  • 1 bay leaf
  • 4 garlic cloves, finely chopped (optional)
  • 1 tablespoon light olive oil
  • 1 tablespoon unsalted butter
  • 2 medium-size leeks, cut in half lengthwise, thinly sliced, and washed, about 3 cups
  • ¼ cup dry white wine
  • 2 tablespoons cream

Peel, quarter, and thinly slice the celeriac. Place the potatoes and celeriac in a soup pot with 1 quart stock, 1 teaspoon salt, a few pinches of white pepper, the bay leaf, and the garlic. Bring to a boil, then reduce the heat, cover the pot, and simmer for 30 minutes, until the potatoes and celeriac are very soft. Remove the bay leaf, then pass through a food mill or quickly mash with a potato masher. Return the potatoes and celeriac to the pot, cover, and cook over low heat.

While the potatoes and celeriac are cooking, heat the olive oil and butter in a sauté pan and add the leeks, ½ teaspoon salt, and a few pinches of pepper. Sauté over medium heat until the leeks begin to soften, about 3 to 4 minutes, then cover the pan and lightly steam them for about 10 minutes. Add the wine and simmer, uncovered until the pan is almost dry.

Add the leeks to the potatoes and celeriac along with 1 to 2 cups stock to reach the desired consistency. Cover and cook over low heat for 20 to 30 minutes. Season with salt and pepper to taste. Stir in the cream just before serving.

Pizza with Escarole, Roasted Peppers, and Olives
(for those of you who still have saved peppers)

Adapted from Anne Somerville’s “Fields of Greens” cookbook

  • ½ tablespoon extra virgin olive oil
  • ½ medium-size head of escarole, washed and chopped, about 4 cups
  • Salt and pepper
  • Splash of sherry vinegar
  • 1 roasted red bell pepper, peeled and thickly sliced
  • Garlic oil
  • Pizza dough (enough to make a 15 inch pizza)
  • ½ medium-size red onion, thinly sliced
  • 8 Nicoise or Gaeta olives, pitted and coarsely chopped
  • 2 teaspoons chopped Italian parsley

Preheat the oven to 500 degrees F.

Heat the olive oil in a sauté pan and add the escarole, ½ teaspoon salt, and a few pinches of pepper. Sauté over high heat for 1 to 2 minutes until the escarole is wilted, then add a splash of sherry vinegar. Set aside to cool.

Toss the peppers with a little garlic oil and sprinkle with sail and pepper.

Place the rolled out dough on a lightly oiled pizza pan or well-floured wooden peel; brush with the garlic oil. Spread the red onions, then the escarole on top, followed by the peppers and olives.

Bake the pizza, in the pan or on a preheated pizza stone for 8 to 12 minutes, until the crust is golden and crisp. Remove it from the oven and sprinkle with the parsley.
Enjoy!

Thanksgiving Day Share Preview

We’re giving you an preview to help you plan your Thanksgiving Day meals. The share Thanksgiving week will include onions, shallots, Brussels sprouts, collards, carrots, parsnips, potatoes, 2 pumpkins, and a large hubbard winter squash.

Field Notes

This week we were really fortunate to have a reprieve from the cold rainy weather long enough to get all of our fall garlic planted in the ground and ready to start growing. Yeah. It was really nice to not have to slog through mud and rain to get it finished. We still have a lot of field work to do to prepare the farm for the quickly approaching winter. The tomato trellising needs to come down, the irrigation tape needs to come out of the fields and get stored, pepper plants need their support stakes removed… Still a lot of work to be done and still four more weeks of CSA to go until the official end of the season!

Categories : CSA Newsletter, Recipe
« Previous Page
Next Page »

Recent Posts

  • CSA Week #22: October 31st & November 2nd
  • CSA Week #21: October 24th & 26th
  • CSA Week #20: October 17th & 19th
  • CSA Week #19: October 10th & 12th
  • CSA Week #18: October 3rd & 5th

Archives

Sauvie Island Organics | © 2025 All Rights Reserved
iThemes Builder by iThemes | Powered by WordPress | Site by LRP