Image

Author Archive for csa – Page 12

Recipes for CSA Week 2

Posted by csa on
 June 4, 2013

photo (22)


Lots of salads this time around. I had to include a classic Caesar Salad again this year as it just is a wonderful way to dress romaine lettuce. And they are some hearty, one-dish meal salads like the steak salad and the sesame noodle one with lots of mizuna and scallions. The red lentil and mustard green dish might seem wintery but it is actually bright and lovely this time of year with the gorgeous mustard greens.

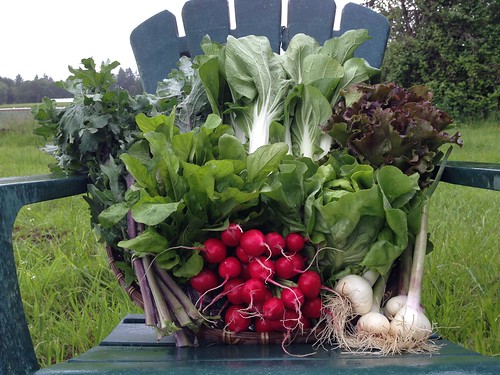
The greens, particularly turnips greens, mustard and mizuna, are the most tender of the greens in your share this week so I suggest using those first. The Chard and Romaine will keep quite well if sealed well in the fridge. The turnips themselves keep well as do the scallions. Enjoy!

Turnip Salad with Mustard, Capers and Scallions
Flank, Skirt or Flatiron Steak Salad
Classic Caesar Salad
Chard, Herb-roasted Chicken and Potatoes with Scallion Mint Vinaigrette
Sesame Noodles with Scallions and Mizuna
Red Lentil, Mustard and/or Turnip Greens and Coconut Milk
Rice and Lettuce Soup

Turnip Salad with Mustard, Capers and Scallions

I made this on a whim this weekend to try to come up with something new for these lovely, sweet, crisp spring turnips and really liked it. It would be wonderful served with roasted potatoes or with a frittata or any kind of meet or fish. Use however many turnips you want and adjust the dressing ingredients accordingly.

4 medium turnips, scrubbed and trimmed but not peeled, cut into small dice (1/2-inch or smaller)
2 scallions, finely sliced (greens and all)
1 tablespoons capers, rinsed and chopped up a bit
¼ cup chopped parsley
1 teaspoon chopped fresh thyme
2 teaspoons whole-grain mustard
2 teaspoons red vinegar (or more to taste)
1 ½ tablespoons good olive oil (or more to taste)
Salt and freshly ground pepper

Put the vegetables and herbs in a medium bowl. Mix the dressing ingredients together in a small bowl and pour over vegetables. Toss well and taste and adjust seasoning. A little lemon juice won’t hurt either if things need brightening a bit.

Flank, Skirt or Flatiron Steak Salad

Serves 4

The beautiful fresh greens and spring onions and herbs this time of year pair well with a flatiron steak (also knows as top-blade or flank or skirt steaks). For this dish you can either toss the thinly sliced steak with the greens and dressing or simply serve the sliced steak along side the salad.

Leftover steak salad makes a wonderful sandwich filling.

For the Salad:

½ small bunch parsley, washed, leaves picked from stems and left whole
3 cups mizuna, well washed, dried and roughly chopped
2 cups romaine, well washed, dried and roughly chopped
2-3 turnips, scrubbed, quartered or halved and thinly sliced
2 scallions, trimmed of roots and any ragged tops, washed, and thinly sliced into rounds (greens and all)

Dressing:

3 tablespoons good olive oil
1 teaspoon Dijon-style mustard (optional)
1 ½ tablespoons red wine vinegar
2 sprigs thyme, finely chopped
½ teaspoon sea salt (more to taste)
Freshly ground black pepper

1 1/4 lbs flatiron steak (about 1 ½ inches thick)
Salt

Put the greens, herbs and spring onions in a large salad bowl or platter. Stir the dressing ingredients together in a small bowl.

Pat the beef dry with paper towels and sprinkle generously with sea salt.

Heat a heavy-bottomed skillet or cast iron pan over medium-high heat. When the pan is hot add the meat and cook, undisturbed for about 3 ½ minutes. Flip the meat with tongs and cook for 3 ½ to 4 more minutes. This should give you a medium rare steak if the steak is about 1 ½ inches thick.

Remove the steak from the pan and let rest on a cutting board for at least 5 minutes. Slice the steak thinly across the grain. You can either leave it in long strips or cut it into smaller pieces and then toss with the greens and the dressing. You can also just dress the greens and serve the sliced steak on the side or on top of the salad. Taste and adjust seasoning with salt and/or pepper.

Classic Caesar Salad

Serves 4-6 depending on appetites and what else is being served

1/2 cup grated Parmesan cheese
2-3 tablespoons freshly squeezed lemon juice
3 tablespoons good olive oil
4-5 garlic cloves, finely chopped
4-5 flat anchovy filets (or more to taste)
1 egg yolk
1/2 teaspoon sea salt (or more to taste)
Freshly grated black pepper
1/4 teaspoon dry mustard (optional)
1 large head of Romaine lettuce, washed, leaves cut in half lengthwise and then cut into 1 1/2 inch ribbons
¾ – 1 cup croutons or toast a slice or two of good crusty bread and tear it into bite-sized pieces

You can either use a food processor or a mortar and pestle. If using the latter, put the garlic, anchovy, pepper and salt in it and pound it into a smooth-ish paste. Scoop the paste out of the mortar and put it into a bowl. Then whisk in the lemon juice and egg yolk and then slowly add the oil and finally the Parmesan. If using a food processor start with the garlic, anchovy, lemon juice and salt and then add the ingredients in the same order. Stir the parmesan at the end after you’ve removed the dressing from the processor.

Toss with Romaine lettuce, top with croutons and some more freshly grated Parmesan.

Chard, Herb-roasted Chicken and Potatoes with Scallion Mint Vinaigrette

Chard, Chicen Potatoes


This is the loveliest platter of food—blanched chard and roasted chicken are dressed with the same, lemony, minty shallot vinaigrette. You can also roast the potatoes and cook the chard and use perfectly cooked hard-boiled eggs (cover eggs generously with cold water, bring to a boil, turn off heat and let sit in hot water for 8-9 minutes, drain and rinse in cold water) instead of chicken or you could use canned Oregon Albacore. The minty dressing is really what ties all together.

3 tablespoons sage, finely chopped
2 tablespoons rosemary, finely chopped
1 ½ teaspoons sea salt1 large bone-in chicken breast half, preferably at room temperature (use eggs or Tuna instead—see headnote)
2 tablespoons olive oil
5 medium to large Yukon gold or red potatoes, well scrubbed and cut into thumb-sized chunks
1/3 cup water
1 large bunch chard, well washed and stems separated from leaves

Dressing

2 scallions, thinly sliced (greens and all)
Juice of 1 lemon (about 3 tablespoons)
6 tablespoons good olive oil (use the best you have)
8 sprigs mint, leaves picked and finely chopped
Salt and freshly ground pepper

Preheat oven to 450.

Mix the chopped rosemary, sage and salt with the 2 tablespoons of olive oil in a small bowl. Dry the chicken breast well with paper towels. Use about half the herb mixture to cover the chicken on all sides, using your hands to thoroughly cover.  Place chicken in an 8” x 13” baking dish.

Toss the potatoes with the remaining herb mixture and arrange the potatoes around the chicken. Add the 1/3 cup water and roast for 35 – 45 minutes. You can test the chicken by carefully cutting into the thickest part of the breast and checking for any pink flesh.

Meanwhile, stir together all the dressing ingredients in a small bowl. Taste and adjust seasoning for salt. It should be quite tart so don’t be shy with the lemon juice.

Bring a large pot of salted water to a boil (use about 1 tablespoon of salt for 3 quarts of water). Chop the chard stems into 1-inch pieces. Pile the chard leaves on top of each other and cut the leaves lengthwise once or twice (depending on how big the leaves are) and then cross-wise four or five times.

Add just the chard stems to the boiling water and cook for 3 minutes, then add the chard leaves and cook for another 2 minutes. Drain well and press out as much moisture as you can against the side of the colander. Return the chard and stems to the pan and cover to keep warm.

When the chicken is done carve the breast into slices. You might need to use your hands to carefully loosen the bottom of the slices from the breastbone. Arrange the chicken on a large platter with the potatoes and the chard and drizzle the chard and chicken generously with the shallot vinaigrette. You can certainly dress the potatoes too, if you have plenty of dressing.

Sesame Noodles with Mizuna and  Scallions
-inspired by Bon Appetit, June 2013

I love green/spring onions and especially the greens so I use them liberally here. You can cut back if you’re not as much of a fan. The chili oil, of which you’ll have some leftover, is wonderful on any salad or meat or roasted veggie.

This makes a lot! You can only dress 2/3 of the noodles and save the rest of the nooles for something else and just have a bigger veggie to noodle ration (which I prefer).

I also made a version with canned Oregon Albacore which was delicious—definitely a meal in itself.

5 scallions, whites and greens separated, thinly sliced
1/2 cup vegetable oil
scant 1 tablespoon crushed red pepper flakes (less if you don’t like a lot of heat)
2 teaspoons sesame seeds
¼ teaspoon freshly ground black pepper
1 lb thin spaghetti (de Cecco is my favorite brand)
3 cups mizuna, chopped

Dressing:
Sea salt
1/4 cup tahini
1/4 cup unseasoned rice vinegar
3 tablespoons soy sauce
2 teaspoons toasted sesame oil
1 teaspoon sugar

Cook spring onion whites, vegetable oil, red pepper flakes, sesame seeds, and pepper in a small saucepan over low heat, stirring occasionally, until oil is sizzling and scallions are golden brown, 12–15 minutes; let chili oil cool in saucepan.

Meanwhile, cook noodles in a large pot of salted boiling water. About 2 minutes before the noodles are until al dente add the snap peas, cook for a few more minutes; drain. Rinse under cold water and drain well and put in a big bowl. Toss with a little of the chili oil to keep noodles from sticking.

Whisk tahini, vinegar, soy sauce, sesame oil, sugar, and 2–3 tablespoons chili oil (depending on desired heat) in a large bowl; season with salt. Add noodles, peas, arugula, and onions tops and toss to coat. I found tossing the salad with my hands was by far the most effective technique to get the thick dressing well distributed. Makes a mess but it’s quick and easy.

Red Lentil, Mustard and/or Turnip Greens and Coconut Milk

This is quick, delicious and easy to vary/adapt. It’s even better the next day. It’s quick enough to make in the morning before you leave the house if you don’t have a hectic schedule and you’ll get the “next day” effect at dinner that evening.

I like the spicy mustard greens in combination with the richness and mellowness of the lentils and coconut milk. You can stretch this dish and serve it over rice but it’s wonderful just plain.

Serves 4 or more

1 tablespoon olive oil, ghee, coconut oil
1 teaspoon brown mustard seeds
1 teaspoon cumin seeds (or more ground cumin)
1 medium onion, diced
3 cloves garlic, minced
1 teaspoon ground cumin
½ teaspoon ground turmeric
1 teaspoon salt (likely will need more)
½ teaspoon red pepper flakes (optional or more/less to taste)
1 cup red lentils
1 can coconut milk (full fat preferably)2-3 cans (I use the coconut milk can to measure) water or vegetable broth (you can use more if you want it thinner – this makes a fairly thick dish which is what I prefer
1 large bunch mustard greens or mustard greens and turnip greens, well washed and chopped
Juice of ½ a lemon (optional)

Put the oil, mustard and cumin seeds in a large pot and heat over medium-high heat until seeds begin to pop. Immediately add the onion and garlic and stir well. Turn down the heat a bit if things brown quickly. Sauté for about 5 minutes. Add the ground cumin, turmeric, red pepper flakes and salt and cook for another minute or two. Add the lentils, coconut milk and water or broth and bring to a boil. Turn down and cook for about 15 minutes. Add the greens and cook for about 10 minutes more or until the lentils have fallen apart. Adjust seasoning to taste with salt and lemon juice.

Rice and Lettuce Soup
–slightly adapted from The Everlasting Meal by Tamar Adler

This recipe caught my attention when I first read this book, several years ago. I came back to the book, as I periodically do, for general inspiration recently. Tamar’s writing just pulls you in and makes you want to cook and makes you feel so creative and frugal and fun—at least for me it does.

And I think this soup could feed six people for about $5 or less . . . if frugality is on your mind. I was skeptical about it but came away satisfied. You can’t skip the butter though—it’s essential!

1 ½ onions, diced
2 tablespoons butter (do not substitute olive oil or anything else)
½ cup Arborio (or other risotto rice like Carnaroli)
1/3 cup chopped parsley
8 cups chicken stock or vegetable broth or a combination of stock/broth and water (which is what I did)
1 head romaine lettuce, well washed, trimmed and cut into thin ribbons (this is important too, that the lettuce is cut up well)
Salt and pepper and good olive oil for drizzling

Gently cook the onions in the butter in a large soup pot over medium heat for about 10 minutes. Add the parsley, rice and broth or stock or water and salt (amount will depend on how salty your stock/broth is, if using) and bring to a gentle boil. Simmer for about 35-40 minutes until the rice is very tender and as Tamar says, “jagged around the edges”. There’s no al dente going on here. Now, if you’re ready to eat, add the lettuce and stir it in well and take it off the heat. Taste and adjust for salt—you need salt here too, like you need the butter. Serve in wide bowls and drizzle with olive oil and a good grinding of pepper.

Categories : Recipe

CSA News: Week 2- June 4 to June 6

Posted by csa on
 June 3, 2013

This Week’s Share

photo (22)

Crop

Family Share

Half Share

Chard, Rhubard Red 2 bunches 1 bunch
Lettuce, Romaine 2 heads 1 head
Mizuna 2 bunches 1 bunch
Mustard Greens 2 bunches 1 bunch
Scallions (Green Onions) 2 bunches 1 bunch
Turnips, Hakurei 2 pounds 1 pound

Share Notes

  • Mizuna: Mizuna’s mild, slightly nutty flavor and pleasant chew make it surprisingly versatile. Raw, you can enjoy it almost as you would lettuce, as the base of a salad, in a sandwich, or even as a bed of greens for meat or fish. Alternately, try throwing it in a stir-fry at the last minute, or wilting and serving with a soup or stew.
  • Mustard Greens: If you are new to mustard greens then give these a little nibble fresh first as they tend to be packed with spicy kick. The mustardy hot taste mellows when cooked.
  • Turnips, Hakurei: Hakurei turnips are of the salad variety, and are great eating fresh in salads or on their own. They also are great  in a stir fry, pickled, and in many other preparations.

Important Things to Remember When Picking-up

  • Please make sure to read all posted signs and make sure to take the correct share type(s). If you take the wrong share type that means another member misses out on theirs.
  • Please check-in on the clipboard each and every week you come to pick-up.
  • Remember to return your empty CSA container from last week when you come to pick-up this week.

Sauvie Island Center Offering Summer Farm Camps for Kids

Sauvie Island Center is a non-profit educating kids about food, farming and the land. They are offering several Summer Farm Camp programs in July, and you can find more information about those and how to register on their website (www.sauvieislandcenter.org/camps).


Categories : CSA Newsletter

Recipes for CSA Week 1

Posted by csa on
 May 28, 2013

photo (21)


I’m thrilled to be back here, creating and assembling ideas and recipes for the delicious SIO produce. I hadn’t realized how much I missed seeing the share photo that SIO posts each week. What a joy! And beautiful joi (choi), this week!

Cooking with a CSA share can be a liberating and creative experience. The decision of what raw materials are best has been made for you so you are left with mixing and matching and experimenting and eating! Many of the recipes and ideas I will provide throughout the season will encourage you to adapt the quantity or spice level or substitute different vegetables and herbs, etc. Your taste and experience will be your best guide and I look forward to hearing about how you use or don’t use these recipes. And I always welcome feedback and suggestions so please be in touch at Katherine@cookwithwhatyouhave.com.

Happy spring and happy cooking!

Recipes

Baked Kale, Tomato and Egg
Spring Salad
Joi Choi “Garnish”
Simplest Joi Choi Stir-Fry
Joi Choi Yakisoba (Soba noodles in broth)
Homemade Mayonnaise and Green Garlic Aioli
Egg Salad with Green Garlic Aioli, Radishes and Arugula

Radish Top Note

If your radish greens are bright and fresh (which they likely will be) you can substitute them for herbs or other greens in your favorite pesto recipe or use half radish tops and half kale or arugula.

Baked Kale, Tomatoes and Egg
–inspired by Food52

Serves 4

This takes about 7 minutes to pull together and about 25-30 minutes to bake. Toast a little bread and you’re set for dinner (or brunch).

1 bunch kale, well washed, trimmed of any tough stems and cut into 1/2-inch ribbons
3-4 cloves green garlic, minced
2 teaspoons balsamic vinegar
1 tablespoon olive oil
1 14-ounce canned, chopped tomatoes (fire-roasted are great here but not necessary
1/2 cup water, broth or stock
½ teaspoon smoked Spanish Paprika (pimenton)
Salt and freshly ground pepper
4 eggs (or more–you’ll have room for 6 in the pan)
More good olive oil for drizzling
Good, toasted bread

Preheat oven to 375 degrees F.

Put tomatoes and water or broth in a baking dish ( 8 or 9 x 13 works well) and stir in pimenton. In a large bowl, toss the kale ribbons with the vinegar, minced garlic, some salt and pepper and some olive oil. Stir this mixture into the tomatoes. Taste to make sure it seems well-seasoned and put in the oven and bake for about 20 minutes until bubbly. You can bake it longer if you want the kale to be softer as it will be tender but not truly soft at 20 minutes. Remove the pan from the oven and make four indentations in the vegetables and crack the eggs into these. Season with sea salt and pepper and return to the oven. Bake until the eggs are cooked to your liking. Serve with good, crusty bread and a generous drizzle of the best olive oil you have. Enjoy!

Spring Salad

Salads are so tender and bright this time of year. And the radishes this week add color and texture to the greens.

½ bunch radishes, scrubbed, trimmed and thinly sliced
Tablespoon of finely chopped chives or tarragon or green onion (if you have any of those on hand)
3 cups arugula, washed, well-dried and torn into bite-sized pieces
3 cups lettuce, washed, well-dried and torn into bite-sized pieces
½ cup toasted, salted sunflower seeds
2-3 tablespoons of the best olive oil you have
1 – 11/2 tablespoons red wine or champagne vinegar
Sea salt and freshly ground pepper

Toss sunflower seeds with a touch of olive oil and a sprinkling of salt and toast in a 350 degree oven until golden and toasty smelling. Let cool. (I always roast more than I need to have on hand for the next week or so).

Put all the vegetables and seeds in a large salad bowl. Add dressing ingredients and toss well. Taste and adjust seasoning.

Joi Choi and Radish “Garnish”

I thought of another fun use for the fleshy stalks. Wash them well and cut as thinly as you can. Mix with radishes cut into matchsticks and dress with sea salt and rice wine vinegar for a delicious, fresh accompaniment to most anything.

Simplest Joi Choi Stir Fry

Wash the choi well and shake or pat dry. Cut into thin ribbons. Heat some sesame or peanut oil in a large skillet or wok. Toss in a little minced green garlic and a couple of pinches of red pepper flakes, salt and the joi choi. You can add the radish tops to this as well. Cook quickly over high heat, keeping the vegetables moving around. Finish with toasted sesame seeds and a little more toasted sesame oil if you’d like—though a little goes a long way so taste as you go.

Joi Choi Yakisoba (Soba noodles in broth)

This Japanese-inspired noodle soup is delicious one-pot meal and takes advantage of the joi choi in the share this week. If you happen to have a carrot or two on hand by all means cut it into matchsticks and add it to the pan with the mushrooms. And if you don’t have tofu you can use cooked chicken. You can use rice noodles or egg noodles instead of soba noodles as well. Adapt at will!

Serves 4, generously

1 8-ounce package soba noodles (or other noodles — see headnote)
2 teaspoons toasted sesame oil
1 onion, cut into ¼-inch half-moons
5 cloves green garlic, trimmed and minced
5 shitake mushrooms, sliced  (optional)
3 cups joi choi, chopped
4 cups water
1/4 – 1/3 cup soy sauce, tamari or Shoyu (I use the smaller amount)
½ pound firm tofu cut into ½ inch cubes (or cooked chicken)
1 tablespoon grated fresh ginger
3 -4 radishes, scrubbed and cut into matchsticks
2 green onions, thinly sliced
Prepare soba noodles according to package directions. Drain and set aside.

Heat oil in a soup pot and add onions and garlic; sauté over medium heat until onion begins to soften. Add mushroom and/or carrots (if using); sauté a few minutes more. Add water, tamari, tofu, and ginger. Bring to a simmer, cover and cook for about 8 minutes. Add joi choi and cook 2 more minutes. Taste and add a little salt if needed. Depending on the soy sauce you use you’ll probably need a bit of salt to bring it all together.

Portion noodles into deep bowls (you may have more noodles than you need so don’t feel you have to use them all for four dishes) and ladle over broth and vegetables. Garnish with the radishes and green onions.

Yakisoba with Joi Choi

Yakisoba with Joi Choi

Green Garlic Notes

I grow garlic so I can exclusively use it in its green form. I’ve been cooking with it daily for the last 8 weeks and it’s such a treat. Depending on how thick/tough the stalks are you’ll want to peel away a few of the outer layers and then mince some of the stalk as well as the cloves though this time of year they may be getting too big for that. I use green garlic anywhere I would use regular garlic but more generously. I like to cook it slowly in a little butter or olive oil or a combination and then add it or begin most any dish with it, soup, stew, pasta sauce, risotto, stir fry, aioli (see below).

Homemade Mayonnaise and Aioli

Omit the green garlic if you just want plain mayonnaise. Aioli is basically garlicky mayonnaise. Green garlic lends itself very well to this technique since it’s milder and sweeter than mature garlic. Traditionally it’s made with mature garlic. Homemade aioli takes about 5 minutes to make and keeps well for a week. I’ve always made it by hand but I know it works fine in the food processor too (though it has a stiffer consistency when made this way) so by all means use that if you want. It’s so delicious and endlessly useful and adaptable. Potato salad, deviled eggs, egg salad (below), sandwiches, spread for grilled fish, dressing for anything.

2 eggs yolks (best from a good, local, organic source as they yolks will not be cooked)
4-5 cloves green garlic, minced
Salt and pepper
1 teaspoon Dijon-style mustard
3 teaspoon lemon juice or more to taste
About 1 ½ cups oil. I use a combo of two-thirds neutral oil like Sunflower and one-third good olive oil. If you use all olive oil it tends to be too bitter and strong.

Whisk the garlic into the eggs yolks with the lemon juice, mustard and salt and pepper. Then very slowly start adding the oil, almost drip by drip for a bit until you things get nice and emulsified. Then you can start adding the oil in a thin stream, whisking all the while (or do the same in the food processor).

Traditionally aioli is served as a dip with raw and steamed vegetables. It’s good with chickpeas, potatoes, asparagus, etc. It’s also wonderful with grilled foods, in a sandwich or spooned in soup or pasta or used instead of mayonnaise in deviled eggs or used in the salad dressing, below.

Egg Salad Sandwiches with Radishes and Arugula

Rich egg salad is perfectly balanced with spicy greens like arugula.

4 barely hardboiled eggs, chopped (I cover eggs in cold water, bring to a boil, turn off heat and let sit in hot water for 8-9 minutes, then rinse in cold water and peel)
3 tablespoons homemade aioli (see above) or regular store-bought mayonnaise
2 teaspoons Dijon-style mustard
Salt and pepper to taste (you won’t need much since the aioli is well seasoned)
Any chopped fresh herbs you have on hand (optional- chives, thyme, parsley, tarragon, oregano are all wonderful)
Arugula, cut into thin ribbons
Very thinly sliced radishes
Good, crusty bread

Stir the aioli/mayonnaise and mustard together then fold in eggs, seasonings and herbs, if using. Taste and adjust seasoning.

Toast bread if on the older side or if you just like it that way (as I do). Spread generously with egg salad, top with sliced radishes and lots of chopped greens. Eat open faced or not. Drizzle with a little olive oil and a little salt (for the greens) if you’d like. Enjoy!


Categories : Recipe

CSA News: Week 1- May 28 to May 30

Posted by csa on
 May 27, 2013

This Week’s Share

photo (21)

Crop

Family Share

Half Share

Arugula 2 bunches 1 bunch
Bok Choi, Joi Choi 2 heads 1 head
Green Garlic 4 stems 2 stems
Lettuce 2 heads 1 head
Kale, Red Ursa 2 bunches 1 bunch
Radishes 2 bunches 1 bunch


Share Notes
  • Bok Choi: Take extra care in washing the stems and leaves of your Joi Choi, soil tends to cozy up in the ridges and bases of the stems. This crop is great both fresh and cooked. 
  • Green Garlic: Enjoy both the green stems and partially formed bulbs of your spring garlic this week. 

Welcome to the 2013 CSA Season

We are excited to start our 28 week culinary journey together. This year we are again working with Katherine Deumling and her SE Portland based Cook With What You Have cooking school. Each Monday afternoon we will post CSA News, which will include a share photo, a list of the vegetables, and any farm notes for the week. This post will be followed on Tuesday morning by a CSA Recipe post from Katherine who will be providing you with weekly recipes, washing and storage tips and other cooking tips related to your share.

Washing Your Weekly Share

Please remember that all produce you receive in your shares is a raw product. Every vegetable should be washed before using.

Your CSA Share Container (watch the video below)

Each week your share is delivered in a Reusable Plastic Container (RPC). You are welcome to take the container with you and return it empty the next week, or you can transfer the items into a container/bags you’ve brought and leave behind the container at  your pick-up site. This season we are again working with IFCO, a company that manufactures and distributes RPCs. Each week we return the used containers to IFCO’s North Portland site, and pick-up clean and sanitized containers for packing CSA shares. Please make sure to watch the short video below so you understand how to collapse and stack these RPC’s, as well as information on recycling the RPC lids. If you leave the lids in the designated recycling container at your pick-up site they will be brought to Agri-Plas Inc, an agricultural plastics recycling company. Alternately you can collect them at home and bring them to any location that accepts recyclable plastic films. If you bring your container home please be sure to return it to your pick-up site the following week. We are charged a fee for every container we do not bring back to IFCO.


We enjoyed meeting many of you at our Spring Farm Tour & Potluck event, and we hope to meet many more of you in the weeks to come. Enjoy your first share of 2013!

Categories : CSA Newsletter

Farm News: May Update

Posted by csa on
 May 6, 2013

Spring (or is that Summer) has Sprung

photo (18)

With the warmest and driest spring on record in years, we could not ask for more ideal weather for plant establishment and growth. That said, boy are we busy with irrigation much earlier than usual. It’s hard to believe, but we have received a mere 2.4 inches of rain in March and 2.9 inches in April. Compared with the 12.5 inches in March and the 4.9 inches in April of 2012, it’s no wonder we are already busy laying irrigation pipe and drip irrigation so that we keep up with the various water needs of the crops.

The Joi choi (see photo above), green garlic, lettuce, kale (see photo below), radishes and bunched mustards planned for your first share are looking beautiful in the field, and we are brimming with excitement at the outlook for the first harvest. With the beginning of May there is plenty of work here on the farm, and we have a full crew starting this week ready for training and preparation for the first CSA harvest and delivery. It’s exciting out here with bodies moving, sprinklers spraying and plants and the people enjoying this glorious spring equally. We hope you too are enjoying your spring, and building excitement for your first share in just three more weeks.

photo (20)


CSA Pick-up Details Coming Soon

The first week of the CSA season is set to begin after Memorial Day, the week of May 28th. You can expect to receive detailed information about your pick-up site by May 15th via email. In the meantime please feel free to email us at csa@sauvieislandorganics.com or call our office 503.621.6921 with any questions you may have.

photo (19)

These sweet peppers, only seeds in early April, are now full grown starts ready for transplant into the field as soon as nighttime temperatures allow.

Come Join Us for the Spring Farm Tour & Potluck

Join us Saturday, May 18st to kick-off the season with a tour of the farm and a CSA Community Potluck. This event is from 11am to 2pm. Tours of the farm will happen at 11am & 1pm and we will share a potluck lunch at noon. Bring your family, friends, kids, neighbors, and anyone you think would enjoy a day on the farm, and don’t forget to bring a potluck dish to share. The farm fields are located at 13615 NW Howell Park Rd, just a mile past the Sauvie Island Bridge.

Sauvie Island Center Offering Summer Farm Camps for Kids

Sauvie Island Center is a non-profit educating kids about food, farming and the land. They are offering several Summer Farm Camp programs in July, and you can find more information about those and how to register on their website (www.sauvieislandcenter.org/camps).


Categories : CSA Newsletter

Farm News: April Update

Posted by csa on
 April 9, 2013

photo (11)

April Showers Bring….CSA Shares in May!!

That’s right, it’s April and we are as busy as the bees out here on the farm. We’ve got two-thirds of our full acre of broccoli transplanted out into the field (see photo above), we started seeding the sun lovers tomatoes, eggplant and peppers in our green house last week, the fava beans are up and on their way (see first photo below), and lettuce starts are being transplanted weekly  (see second photo below) to make sure we have plenty for your shares come May. We are also in the process of interviewing and hiring our 2013 Seasonal Field Crew, and are always on the hunt for hardworking individuals with a passion to learn and contribute to our team, and there is more information available on our website.

photo (16)

photo (14)


Shares are filling up, Don’t Miss Out on Yours

We are nearly full for the 2013 season, so if you’ve been on the fence now is the time to take the leap. Have a friend/neighbor/co-worker that missed out last year? Let friends, family and co-workers know about the joys of being an SIO CSA member now, and if they mention your name in their sign-up form comments then we’ll send you a $5 gift card to Food Front Cooperative Grocery. Food Front has been a long time customer of SIO, purchasing a variety of our crops throughout the season. In just the last year we harvested and delivered over 2,900 heads of lettuce and 250 pounds fennel to our friends at Food Front, and with their commitment to quality local producers and a delicious products we look forward to years of working together in the future.

Signing-up is easy, just fill out and submit a Community Farm Agreement on our website we’ll get back to you via email confirming your sign-up and payment option.

photo (15)


Come Join Us for the Spring Farm Tour & Potluck

Join us Saturday, May 18st to kick-off the season with a tour of the farm and a CSA Community Potluck. This event is from 11am to 2pm. Tours of the farm will happen at 11am & 1pm and we will share a potluck lunch at noon. Bring your family, friends, kids, neighbors, and anyone you think would enjoy a day on the farm, and don’t forget to bring a potluck dish to share. The farm fields are located at 13615 NW Howell Park Rd, just a mile past the Sauvie Island Bridge.


Getting Deep: Chard Transplanting at SIO

Check out this video taken today of our Harvest and Pack-Out Manager Jen transplanting chard starts with the  spring crew. The photos below the video show the chard starts in the trays before they are popped out for planting (top photo), and also the chard starts on the surface of the soil after they have been popped from the tray, dropped at eleven inch spacing, and ready for someone to plant them into the ground.

photo (12)

photo (13)

Categories : CSA Newsletter

Farm News: March Update

Posted by csa on
 March 6, 2013

Excited for Spring? So are we!

tshirts_pumpkins

Members Jack (left) and Cora (right) wear their SIO t-shirts with pride and hold on tight to their last winter squash of the season. They pick-up at the Lincoln Street Church site along with their mom Emily.

Late Winter on the Farm

It’s March, and with some lucky days of sun in February we have been able to get into the fields to turn in fall and winter sewn cover crops and make first passes for tillage in beds that will be planted into earliest this spring. Onions, leeks, and lettuces are busy setting roots in the comfort of greenhouse. While early mornings of harvest and packing up the truck with your shares are still couple months away, the farm is bursting with activity as we gear up for the busy and bountiful season ahead.

photo (6)

photo (3)

Now is the time–Sign-up for 2013

Although it’s only the beginning of March, the first week of the season will be here before you know it. Sign-up now for the coming season before we fill up. Know someone that kept eyeing your share last year? Have a friend/neighbor/co-worker that missed out last year? Let friends, family and co-workers know about the joys of being an SIO CSA member now so they don’t miss out again, and if they mention your name in their sign-up form comments then we’ll send you a $5 gift card to Food Front Cooperative Grocery. Food Front has been a long time customer of SIO, purchasing a variety of our crops throughout the season. In just the last year we harvested and delivered over 2,900 heads of lettuce and 250 pounds fennel to our friends at Food Front, and with their commitment to quality local producers and a delicious products we look forward to years of working together in the future.

Toast the Farm with Cory Schreiber!

event-masthead-V1 2

Join the Sauvie Island Center on Tuesday, March 12th as they raise a glass in celebration of farm-based education. Renowned chef Cory Schreiber and his students from The International  Culinary School at The Art Institute of Portland will prepare hors d’ oeuvres inspired byDishing Up Oregon, a collectionof recipes celebrating Oregon’s farm-to-table flavors. Cookbook author Ashley Gartland will discuss the featured recipes.  Best of all, we’ll pair these tasty morsels with Cooper Mountain‘s certified organic and biodynamic wines. Tickets start at just $25.
What?
Toast the Farm! A benefit for the Sauvie Island Center
Where?
Sharp Restaurant at
The International Culinary School, 1122 NW Davis Street
When?
Tuesday, March 12th
5:30 to 7:30 pm
TicketsTickets are $40 with a signed copy of  Dishing Up Oregon or $25 without the book. Ticket prices increase to $45/$30 begining Monday, March 11th.Hors d’ouevres, wine and beer are included in the ticket price.
CMVlogoAiPD_ICS_HZ_4C 2Dishing Up Oregon

Save the Date: Come Join Us for the Spring Farm Tour & Potluck

Join us Saturday, May 18st to kick-off the season with a tour of the farm and a CSA Community Potluck. This event is from 11am to 2pm. Tours of the farm will happen at 11am & 1pm and we will share a potluck lunch at noon. Bring your family, friends, kids, neighbors, and anyone you think would enjoy a day on the farm, and don’t forget to bring a potluck dish to share. The farm fields are located at 13615 NW Howell Park Rd, just a mile past the Sauvie Island Bridge.

Calling all CSA Containers!!

Do you have any black CSA container laying around your house, office or car? You are not alone, so get it off your chest and let us know. We are happy to figure out a way to get it out of your way and back onto the farm.


Categories : Blogroll, CSA Newsletter, Farm News & Updates, Uncategorized

Happy New Year from SIO

Posted by csa on
 January 4, 2013

photo (1)

Wishing you a Happy, Healthy and Carrot-ful 2013!

Show Your SIO Spirit–Sign-up for the 2013 Season

It’s hard to believe we’ve entered a new year, but that means we that much closer to the beginning of the season. For those of you already longing for fresh spring greens, crisp radishes, and pungent green garlic you can sign up for your share of the 2013 season now. Complete and submit the Community Farm Agreement at http://sauvieislandorganics.com/join.php and send in your $100 deposit to secure your spot. If you have not yet signed up for the 2013 CSA season now is a great time to do so. Sign up in January and you will receive a thank you loaf of bread from our business partner Grand Central Bakery. Grand Central Bakery has been a long time customer of SIO, purchasing a variety of our crops throughout the season. In just the last year we harvested and delivered over 6,400 heads of lettuce to our friends at GCB, and with their commitment to quality local ingredients and a delicious product we look forward to years of working together in the future.

Mail deposits & payments to:

Sauvie Island Organics
20233 NW Sauvie Island Rd
Portland, OR 97231

Or call us in the office 503.621.6921 to pay over the phone by credit card.

We look forward to growing for you in 2013!

Wanting a sweet taste of SIO now? Order Bulk Carrots & Pick-up at the Farm after January 16th

We all love SIO carrots, and we know many of you juice, pickle, and love to chomp chomp chomp those carrots down, and if you fit that description the Bulk Carrots option may be for you. We will be selling 20 pound boxes of carrots (no tops) for $25. To order reply to any email from the farm, include your name, number of 20lb boxes you’d like to receive. We will email back confirming your order and to arrange the date for pick-up at the farm after January 16th.

Categories : Blogroll, CSA Newsletter, Farm News & Updates, Uncategorized

Recipes for CSA Week 28

Posted by csa on
 December 4, 2012

Recipes

It seems to be comfort food week —cozy, cozy fair which is what I crave with these cool, dark days. Do pick up some arugula or other winter salad greens if you’re out and maybe some fresh walnuts–both used in the recipes below. This is also the last week of the share so I wish you happy Holidays and a delicious, healthy and peaceful winter. I look forward to seeing you here again in late spring for the 2013 season. Thank you for cooking and please do send feedback of any kind.

All the best, Katherine Deumling (Cook With What You Have)

Provencal Cabbage Gratin
Rice and Smothered Cabbage Soup
Winter Squash and Peanut Stew
Spiced Squash and Lentil Salad
Onion or Leek and Winter Squash Panade
Roasted Beet, Walnut and Arugula Salad
Beet Sandwiches 

Provencal Cabbage and Leek Gratin
–adapted from Martha Rose Shulman in the NY Times

Serve this hearty gratin as a main dish. It’s good hot or at room temperature.

1 ½ lbs pounds cabbage, quartered, cored and cut in thin ribbons (about ¾ of a medium cabbage)
3 tablespoons good olive oil
1 onion, diced
2 leeks, carefully washed, cut in half lengthwise and cut into ½-inch slices
2 large garlic cloves, minced
6 leaves fresh sage, chopped
1 teaspoon fresh thyme leaves
Salt, preferably kosher salt, and freshly ground pepper
2 eggs
1/2 cup rice, preferably a short grain rice like Arborio, or brown rice, cooked
3 ounces Gruyère cheese or other flavorful grating cheese (sharp cheddar would be fine), grated (3/4 cup, tightly packed)
3 tablespoons breadcrumbs

Preheat the oven to 375 degrees. Oil a two-quart gratin. Heat two tablespoons of the olive oil in a large, heavy nonstick skillet over medium heat, and add the onion and leeks. Cook, stirring often, until tender and translucent, about five minutes. Stir in the garlic, sage and thyme, and cook for another minute until fragrant. Add the cabbage and salt to taste. Add 1/2 cup water, and bring to a simmer. Cook, stirring often, for 10 minutes until the water has evaporated; the kale and cabbage should be wilted and fragrant but still have some texture and color. Add pepper, taste and adjust salt.

Beat the eggs in a bowl, and stir in the cooked vegetables, the rice and Gruyère. Stir together well, and scrape into the baking dish. Sprinkle the breadcrumbs over the top, and drizzle on the remaining olive oil. Bake 40 to 45 minutes, until firm and browned on the top. Allow to sit for 10 to 15 minutes before serving. Serve hot or warm.

Rice and Smothered Cabbage Soup
–from the Wednesday Chef

This involves two steps but it’s worth every minute. It’s nothing much to look at but the flavor is wonderful.

Serves 3-4

For the cabbage:

2 pounds green cabbage
1/2 cup chopped onion
1/4 cup extra-virgin olive oil
1 tablespoon chopped garlic
Salt and freshly ground black pepper
1 tablespoon wine vinegar

Detach and discard the first few outer leaves of the cabbage. Shred the remaining head of cabbage very fine, either with your food processor’s shredding attachment or by hand. Be sure to remove the cabbage’s inner core.

Put the onion and olive oil and a large sauté pan and turn the heat to medium. Cook the onion, stirring, until it’s softened and taken on some color. Then add the garlic. When the garlic has turned a pale gold, add the shredded cabbage. Turn the cabbage over 2 or 3 times to coat it well, and cook it until it has wilted.

Add salt, pepper, and the vinegar to the pan. Turn the cabbage over once, completely, then lower the heat to minimum and cover the pan tightly. Cook for at least 1/2 hour, or until it is very tender, stirring from time to time. Add 2 tablespoons of water, if needed, during the cooking if the cabbage becomes too dry. When done, taste and add salt and pepper to taste, if needed.

For the soup:

The smothered cabbage from recipe above

3 cups homemade meat broth or 1 cup canned beef broth diluted with 2 cups of water or 1 1/2 bouillon cubes dissolved in 3 cups of water
2/3 cup Arborio rice
2 tablespoons butter
1/3 cup freshly grated Parmesan
Salt and freshly ground black pepper

Put the cabbage and broth into a soup pot, and turn on the heat to medium.

When the broth comes to a boil, add the rice. Cook, uncovered, adjusting the heat so that the soup bubbles at a slow but steady boil, stirring from time to time until the rice is done. It must be tender, but firm to the bite, and should take around 20 minutes. If while the rice is cooking, you find the soup becoming too thick dilute it with a ladleful of homemade broth or water. The soup should be on the dense-ish side when finished.

When the rice is done, before turning off the heat, stir in the butter and the grated cheese. Taste and correct for salt and pepper. Ladle the soup into individual plates and allow it to settle a few minutes before serving.

Winter Squash and Peanut Stew
–Inspired by Gena Hamshaw via Food52

The original recipe uses yams or sweet potatoes but it’s delicious with butternut, red kuri, hubbard or buttercup. I wouldn’t use delicata as it’s not meaty enough. This stew is rich, nutrient dense, sweet, savory, and spicy and vegan. Garnish with green onions and crushed roasted and salted peanuts for an extra kick. It may seem similar to last weeks red lentil and winter squash dhal but the peanut butter and cinnamon and peanuts put this stew on the African continent.

You can also add carrots or substitute carrots for some of the squash.

Serves 4

1 tablespoon olive oil
1 onion, diced
2 cloves garlic, crushed
1 1/2 tablespoon ginger, minced
2 pounds winter squash cut into chunks (you can always roast a whole or half squash, seeds strings and all, for 20 minutes or so in a 400-425 oven and then remove it and peel and dice which is easier than doing it raw and then proceed with the recipe)
A couple of carrots (see headnote), scrubbed and cut into rounds
1/2 cup red lentils, rinsed and drained
2 cups canned tomatoes, juice and all
1 teaspoon ground cinnamon,
2 teaspoons ground cumin
1/2 teaspoon ground turmeric,
Dash of cayenne pepper (to taste)
1/2 teaspoon sea salt (or to taste)
4-5 cups Vegetable stock + extra as needed (I use homemade veggie bouillon as you might imagine☺)
1/4 cup creamy peanut butter
1/4 cup green onion, thinly sliced
1/4 cup roasted and salted peanuts, chopped

Heat olive oil in a large pot set on medium heat. Add the onion and begin sauteing till onion is getting translucent (about 3 minutes). Add the garlic and ginger, and continue to saute for another 3 minutes, until garlic is fragrant. Add the squash, the red lentils, the tomatoes, the cinnamon, cumin, turmeric, and cayenne and give it all a good stir to combine.

Add 4 cups vegetable stock and bring mixture to a boil. If there isn’t enough broth to cover everything but at least 1 inch, add another cup of stock. When soup boils, reduce to a simmer and cook for 40-45 minutes, or until squash and lentils are very tender. If you need more broth as the mixture cooks, add it.

Add peanut butter and stir well. Using an immersion blender, blend soup till about half of it is pureed and the other half still has texture. The soup should appear creamy, but chunks of squash potato can be visible.

Season to taste, adding more salt and pepper as needed. 5. Serve, topped with a tablespoon each of green onion and crushed peanuts.

Spiced Squash and Lentil Salad
–loosely adapted from Bon Appetit

This is my idea of a perfect winter dish. It’s best if you have some arugula or water cress or spinach or parsley or some other flavorful green to toss in at the end. Alternatively a couple of thinly sliced scallions would be a good addition.

Serves 6-8 as a side

¾ cup French green lentils
2 pounds butternut squash, peeled, seeded, and cut into 1-inch pieces (or other squash—and you can always roast a different kind of squash for 20 minutes or so in a 400-425 oven and then remove it and peel and dice which is easier than doing it raw and then proceed with the recipe)
3 teaspoon olive oil, divided
1 teaspoon ground cumin
1 ½ teaspoons smoked Spanish paprika
1 teaspoon kosher salt
3-4 cups arugula or other green, torn or roughly chopped (optional – see headnote)
2-3 ounces feta or soft goat cheese, crumbled
1 – 1 ½ tablespoons red wine vinegar

Preheat oven to 375ºF. Place squash on a baking sheet and toss with 2 tablespoons oil, cumin, paprika, and salt. Roast 20 minutes. Turn squash over. Roast until tender, about 10 minutes. Cool.

Meanwhile cook lentils in boiling salted water until tender but firm, about 30 minutes. Drain and rinse under cold water. Drain again.

Combine lentils, squash, and oil from baking sheet with whatever green you’re using, half of the cheese, vinegar, and 1 tablespoon good olive oil. Season with salt and pepper. Sprinkle remaining cheese over.

Onion or Leek and Winter Squash Panade

This is a brilliant way to use up stale bread, but fresh can be used as well. Just make sure it’s a hearty rustic loaf with a good crumb and crust. I used an aged cheddar as my cheese.

2-3 large yellow or sweet onions (2lbs)
(you could alternatively use leeks for a delicious twist)
2-3 teaspoons thyme, leaves picked
½ a medium winter squash, peeled and cut into ¾-inch dice for about 3 – 4 cups
1/2 medium loaf rustic bread (1/2lb), torn in to chunks
1 packed cup (more or less) cheese (sharp cheddar, gruyere, aged-assiago; parmesan, etc.), grated
3 1/2 cups vegetable or chicken stock (I use homemade veggie bouillon)

Preheat oven to 400F

Cut onion in half lengthwise. Peel, then slice into half moons about 5mm (1/4in) thick. Heat 3 tablespoons olive oil in a large frying pan. Cook onion stirring occasionally until soft and golden brown. No need to caramelize. Stir in the thyme. If using leeks, cut them in half lengthwise and wash very well and cut into ½ moon as well and cook as you would the onions.

In a medium heatproof dish layer about a third of the onions. Sprinkle over some of the bread and cheese and squash. Repeat until all the ingredients have been used. You want to be able to see a little of each on the top. Bring stock to a simmer. Pour over the onion dish. Season.

Cover and bake for 30 minutes. Remove cover and bake for another 20 – 30 minutes or until the top is golden and crunchy and the stock has been absorbed by the bread. Run under the broiler for a few minutes if it’s not crispy enough. Let sit for 10 minutes before serving if you can.

Roasted Beet, Walnut and Arugula Salad

As you know I’m a fan of roasting all your beets at once. That way you have them all week, tempting you to add them to many things all week. My current favorite is this salad. There are fresh walnuts in the all the farmers’ markets right now and the combination is just too good. And if you don’t have walnuts, toasted pumpkin seeds are a good alternative.

Beets (scrubbed well but not peeled and roasted in a tightly covered pan for about 45 minutes with a couple of tablespoons of water until tender- then peeled and diced or sliced or cut into wedges)
Toasted walnuts (I bake them in an 350 oven for about 8-10 minutes or until nicely browned and smelling good), broken up a just a bit
Arugula (or other strongly flavored winter greens like tender mustards, radicchio or any kind of chicory), well washed, dried and roughly chopped or torn
A handful of diced sharp cheddar or crumbled blue or feta or goat’s cheese (optional)
Red wine vinegar (beets like acidity so the typical 3/1 ration olive oil to vinegar works well here)
Good olive oil
Salt and pepper

Toss everything together. Taste and adjust seasoning if needed.

* Thinly sliced shallots or green onions are a nice addition.

Roasted Beet Sandwiches

I’ve mentioned these before but will do so again since they’re the perfect winter sandwich. And if you have roasted beets on hand (see previous recipe) they’re a snap.

Good crusty bread (toasted if a few days old), goat cheese or cream cheese or pumpkin seed cilantro pesto or some other spread of your choice. Lots of sliced beets, maybe some fresh arugula, a drizzle of olive oil and generous salt and pepper and you’re done.


Categories : CSA Newsletter

CSA Week 28: December 4 to December 6

Posted by csa on
 December 4, 2012
week28_share_2012

Family Share shown in photo above

This Week’s Share

Crop

Family Share

Half Share

Beets, Bull’s Blood Red 2 pounds 1 pound
Cabbage 1 large head 1 medium head
Carrots 5 pounds 2 1/2 pounds
Leeks 6 each 3 each
Winter Squash, Delicata 4 each 2 each
Winter Squash, Mixed 2 each 1 each

Share Notes

  • Storage Tips: Carrots, beets and leeks store best in a plastic bag in the refrigerator or other cool dark location (garage, basement, cellar, etc), and should keep well if stored properly for 2 to 4 weeks. Winter squash stores best in cool, dry, dark place (garage, basement, cellar, etc), and should keep well if stored this way for 3 to 6 weeks.

2012 Season Comes to a Close: Thank You & See you Next Season

That’s right, it’s here, the last week of the 2012 CSA season has arrived. Thank you to you, our members, for another great season. Thank you to our generous and patient site hosts and site coordinators for offering their space and time for another season of successful pick-ups. And thank you to our awesome and hard working crew for seeding, planting, weeding, harvesting, irrigating, tractoring, washing, packing, and delivering all season long in order to bring you your share of the harvest each week.

Box Share Members: Please Return Your Containers

Please return your final empty bin (and any others you may have collected) to your site within 1 week of your final pick-up. We will be by to collect them on your usual delivery day next week. We are charged a fee by the company we rent them from for each container that is not returned, so please please please search your house, garage, trunk, and porch for any containers on the loose and return them to your usual pick-up site. Thank you in advance for returning your containers.

Recipe Love: Thank You Katherine for a Season of Cooking

katherine_duemling
We just couldn’t close out the season without giving a big THANK YOU to our weekly recipe extraordinaire Katherine Deumling. We will be teaming up with Katherine Deumling (pictured above) and her SE Portland based Cook with What you Have (www.cookwithwhatyouhave.com)  again in 2013 to bring you weekly recipes and other cooking tips related to your weekly share.

Katherine says “I help people cook more often and have fun in the kitchen by becoming confident, creative cooks using what grows in our fertile region. By offering tips, recipes and simple and creative ways to use the produce I hope to eliminate any fear or guilt of not using all the produce or the boredom of making stir-fries every night”.

You can always look back at Katherine’s recipes and tips from the season in our blog archives, but we also suggest following her on her blog (http://cookwithwhatyouhave.wordpress.com/) where she talks about the ups and downs and the whats and whys of feeding a family well in this busy world. Katherine also teaches classes focusing on what’s in season. The classes typically focus on straightforward weeknight dinners, and you can find her current offering on her website.

Show Your SIO Spirit–Sign-up for Next Year

It’s hard to believe the end is here, but wow, what a great season of eating is has been. For those of you already longing for fresh spring greens, crisp radishes, and pungent green garlic you can sign up for your share of the 2013 season now. Complete and submit the Community Farm Agreement at http://sauvieislandorganics.com/join.php and send in your $100 deposit to secure your spot.

  • PAY IN FULL by December 15th, 2012 and receive a THANK YOU BOX of STORAGE VEGGIES
    • 20lbs for Full Share and 10lbs for Half Share of mixed roots vegetables and winter squash
    • Thank You Box can be picked-up out at the farm by arrangement throughout the month of December
  • Pay your deposit by December 15th, 2012 to guarantee the 2012 share pricing.

Order Bulk Carrots– Pick-up at the Farm in December

We all love SIO carrots, and we know many of you juice, pickle, and love to chomp chomp chomp those carrots down, and if you fit that description the Bulk Carrots option may be for you. We will be selling 20 pound boxes of carrots (no tops) for $25. To order reply to any email from the farm, include your name, number of 20lb boxes you’d like to receive, and what week in December you would like to come pick-up your box. We will email back confirming your order and to arrange the date for pick-up.


Categories : Blogroll, CSA Newsletter, Farm News & Updates, Uncategorized
« Previous Page
Next Page »

Recent Posts

  • CSA Week #22: October 31st & November 2nd
  • CSA Week #21: October 24th & 26th
  • CSA Week #20: October 17th & 19th
  • CSA Week #19: October 10th & 12th
  • CSA Week #18: October 3rd & 5th

Archives

Sauvie Island Organics | © 2025 All Rights Reserved
iThemes Builder by iThemes | Powered by WordPress | Site by LRP